
Sign and Encrypt Email in Microsoft Outlook
Version History
| Version Number | Date | Change Description |
|---|---|---|
| 2.0 | 03/24/2026 | Updated guidance for classic Outlook for Windows (Microsoft 365 Apps). |
| 1.0 | 06/13/2023 | Initial guidance for Microsoft Outlook 2016. |
This guide was developed in collaboration with the United States Office of Personnel Management
Personal Identity Verification (PIV) cards contain cryptographic certificates that support S/MIME secure email. Secure email includes two protections:
- Digital signatures, which verify who sent the message and prevent tampering
- Encryption, which ensures only the intended recipient can read the message
These instructions apply to classic Outlook for Windows included with Microsoft 365.
Outlook requires that your account’s email address matches the email address encoded on your PIV certificates.
Before You Begin
Before configuring Outlook:
- Confirm your organization supports S/MIME with third-party PKI certificates.
- Ensure your PIV card, middleware, and smart card reader are functioning.
- Browser-based Outlook requires a separate extension for S/MIME, which may not be enabled.
Configure S/MIME in Outlook
These steps reflect the current configuration experience in classic Outlook for Windows (Microsoft 365 Apps).
-
Insert your PIV card.
-
Open Outlook and go to File > Options > Trust Center > Trust Center Settings.
-
Select Email Security.
-
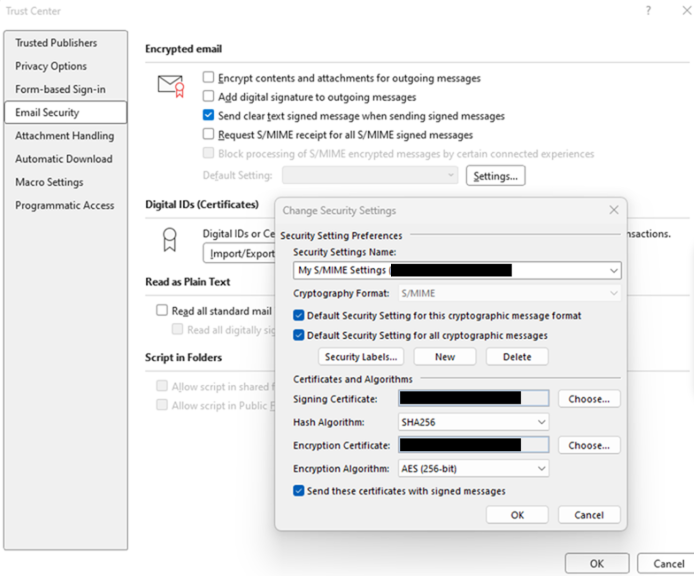
Under Encrypted Email, select Settings.
-
Select New to create a new security configuration.
-
Enter a name such as PIV Secure Email.
- Select Choose next to Signing Certificate.
- Choose your PIV digital signature certificate, then select OK.
- Set Hash Algorithm to SHA256.
- Select Choose next to Encryption Certificate.
- Choose your PIV key management or encryption certificate, then select OK.
- Set Encryption Algorithm to AES 256-bit.
-
Enable Send these certificates with signed messages.
- Select OK to save.
Note: The following screenshot shows an example of a completed security preference configuration.
Certificate Publication in Modern Microsoft 365
Many Microsoft 365 tenants no longer display the older Publish to GAL button. When this option is absent, certificate publication occurs in one of the following ways:
Automatic Publication (Default for Many Tenants)
Exchange Online automatically makes your certificate available internally after you send a digitally signed email.
Administrator-Managed Publication
Your organization may publish certificates centrally using Active Directory, Entra ID, or automated provisioning.
Certificate Sharing via Signed Messages
When you send a digitally signed message, Outlook includes your public signing and encryption certificates. This allows recipients to encrypt messages to you even without GAL publishing.
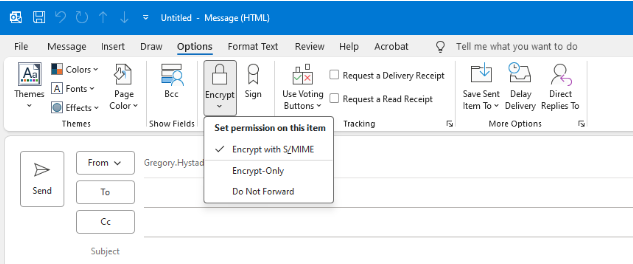
Send a Digitally Signed Email
-
Compose a new message.
-
In the ribbon, select Options.
-
Select Sign (red ribbon icon).
-
Send the email.
-
Enter your PIV PIN when prompted.
Send an Encrypted Email
-
Compose a new message.
-
Select Options.
-
Select More Options.
-
Select Security Settings.
-
Check Encrypt message contents and attachments.
-
Select OK.
-
Send the message.
Note: It is common to enable both encryption and signing so the recipient automatically receives your certificates.
Import a Recipient’s Encryption Certificate Manually
Use this process when Outlook cannot locate a recipient’s certificate through your directory or a prior signed email.
-
Obtain the recipient’s public encryption (key management) certificate.
-
Open the Home tab.
-
Select Address Book.
-
Go to File > New Entry.
-
Select New Contact, then OK.
-
Add the recipient’s name and email address.
-
Select the Certificates tab.
-
Select Import and choose the certificate file.
-
Select Save & Close.
Decrypt an Encrypted Email
Outlook can decrypt encrypted messages if the matching private keys are available from your PIV card or from Windows’s cryptographic key store.
-
Open the encrypted message.
-
Insert your PIV card when prompted.
-
Enter your PIN.
If you cannot decrypt older messages, your organization may maintain historical key management keys separately. Contact your IT administrators for recovery if needed.
Other Helpful References
- Enabling S/MIME on Mac Mail
- Enabling S/MIME on Thunderbird email client
- S/MIME with Gmail
- S/MIME with New Outlook
- S/MIME with Exchange Online