Okta Yubikey Implementation Guide
![]()
![]()
| Version Number | Date | Change Description |
|---|---|---|
| 2.0 | 03/17/2026 | Initial draft. |
| 1.0 | 06/01/2024 | Initial draft. |
Executive Summary
This guide details the implementation and usage of YubiKey, a durable and portable external security device, by federal employees and contractors to enhance the security of federal systems through FIDO2 compliant multi-factor authentication (MFA). It highlights the benefits of YubiKey, emphasizing its resistance to phishing attacks and broad compatibility with various platforms, making it an ideal choice for securing sensitive government data.
The guide provides comprehensive instructions for initial setup on both MacOS and Windows, including downloading the Yubico Authenticator, creating a secure PIN, and configuring the device with federal systems. Additionally, it addresses questions concerning the necessity of a PIN for YubiKey, the limitations of using platform authenticators in a federal context, and troubleshooting tips for issues like forgotten PINs or device resetting. This document is a crucial resource for federal employees and contractors tasked with maintaining high security standards using YubiKey on federal systems.
Why YubiKey?
The YubiKey is a small, external authenticator, also known as a security key, designed to make your online accounts more resistant to phishing and compromise. It is used to perform multi-factor authentication (MFA) when users access secure systems. The YubiKey represents an advancement in MFA technology by offering a more secure and user-friendly alternative to traditional methods like text-based codes or mobile authenticator apps. A key feature of the YubiKey is the touch sensor, which is used to show that there is someone at that device.
Secure against Phishing Attacks
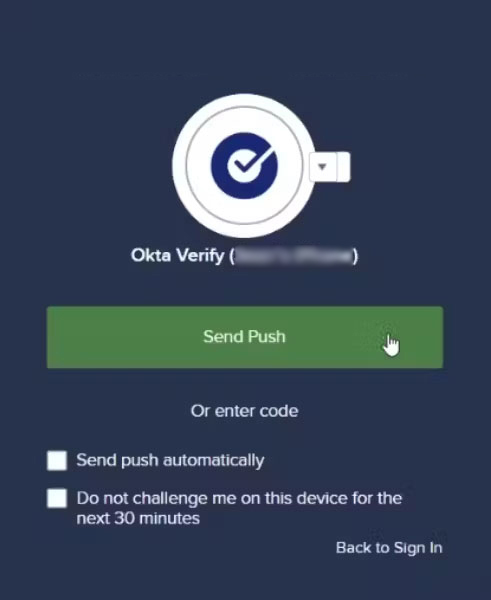
Using YubiKey is generally considered more secure than conventional MFA methods like Onetime Passwords OTP or Time-based One-time Passwords TOTP used by mobile apps such as Google Authenticator or Okta Verify. With OTP and TOTP, users must verify the authenticity of a website and secure their connection, introducing elevated phishing risks.
The YubiKey Series 5 employs FIDO2 technology, which uses cryptographic credentials to validate connections to legitimate websites, thus eliminating the need for users to verify connection authenticity. This minimizes phishing risks, including cross-site scripting, typo-squatting, and man-in-the-middle attacks. Additionally, YubiKey requires physical interaction and may use PINs, ensuring data transmission only occurs with user consent, further enhancing security.
Other features of YubiKeys include
- Rugged and Portable: The YubiKey is made with solid materials like glass-fiber reinforced plastic, can handle water and dust, and does not need batteries.
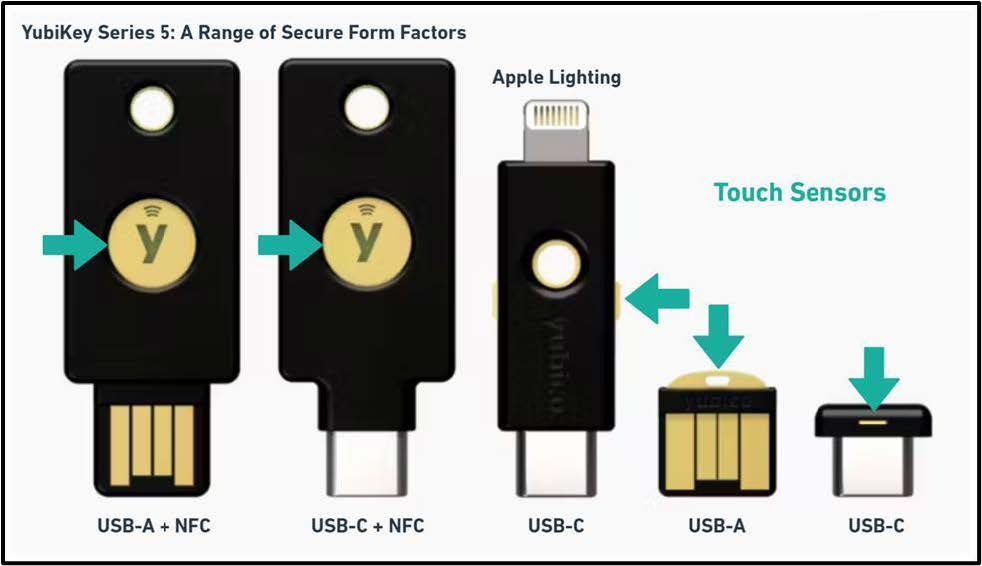
- Easy to Connect: YubiKeys are available in USB-A and USB-C formats, as well as having a Near Field Communication (NFC) option for mobile devices, making them compatible with most computers and smartphones.
- Broad Compatibility: The YubiKey is compatible with many operating systems like Windows, macOS, Chrome OS, Linux, and popular web browsers like Chrome, Safari, and Edge. It can help secure access to most online services and platforms.
- FIPS Certified: The YubiKey series also offers FIPS compliant versions which are required by government agencies and regulated industries like healthcare.
Prerequisites
To use YubiKey for FIDO2 authentication on Okta, several prerequisites must be met to ensure a successful deployment and operation
- Compatible YubiKey Device: Ensure that the YubiKey model you intend to use supports FIDO2. YubiKey 5 Series or newer models are typically compatible.
- Supported Web Browsers: The web browser used to access Okta must support WebAuthn. Popular browsers such as Google Chrome, Mozilla Firefox, Microsoft Edge, and Safari typically have this support.
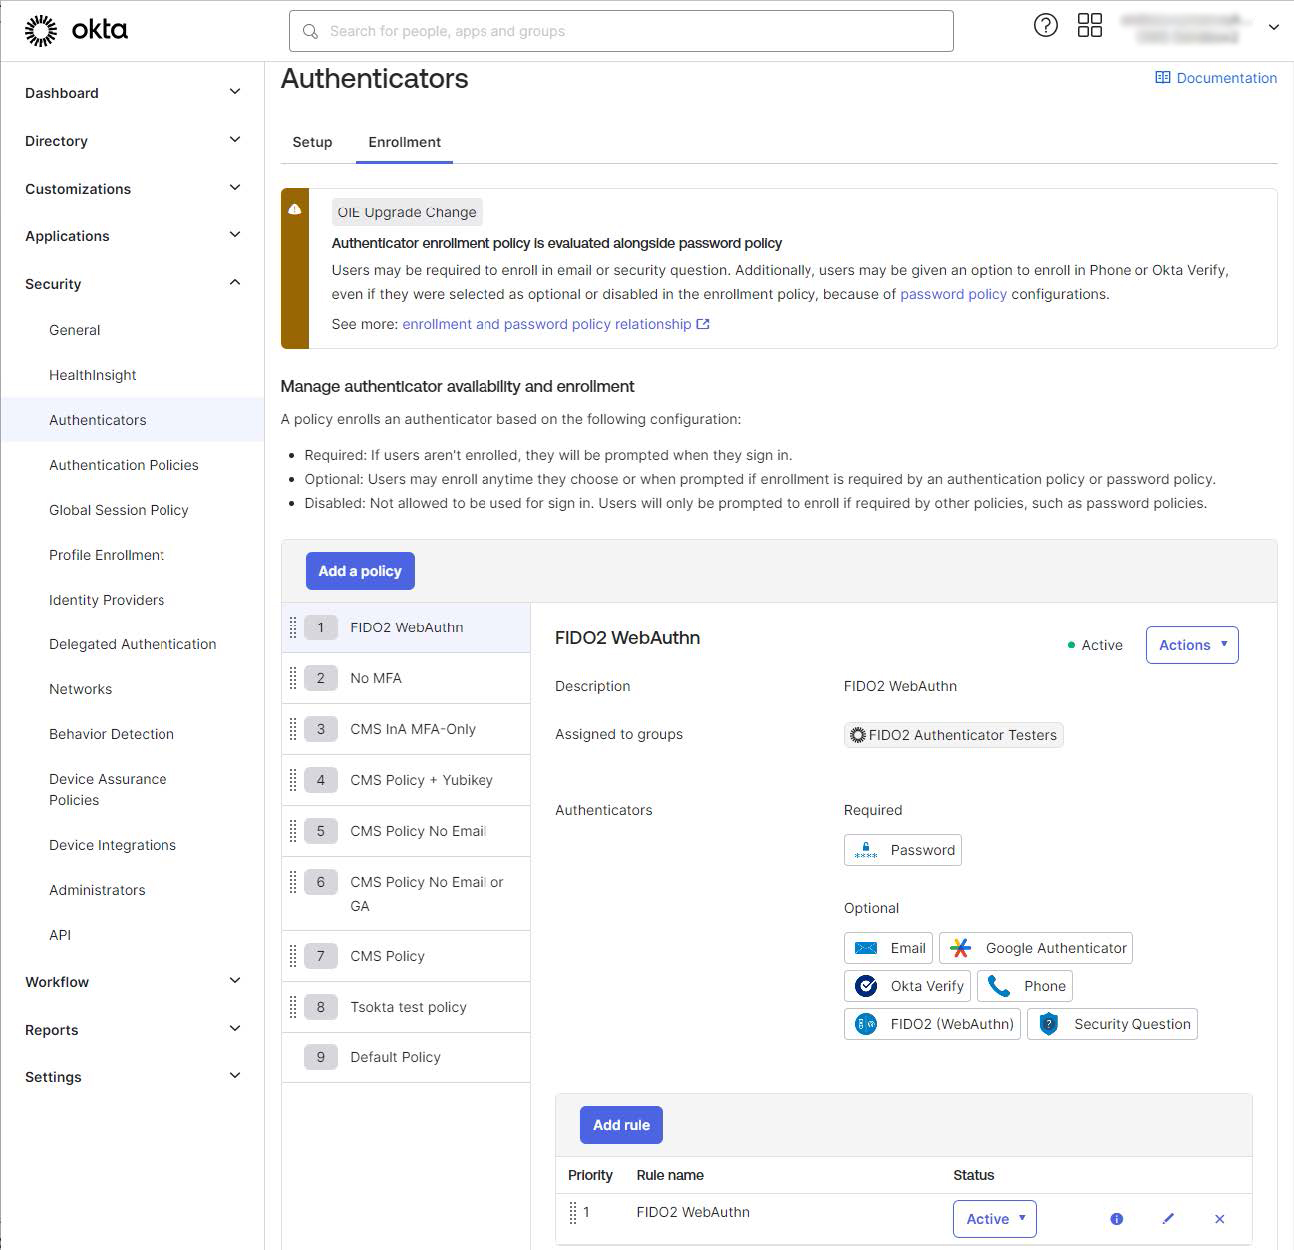
- Okta Configuration: Okta must be configured to allow FIDO2 as an authentication method. This involves setting up and enabling FIDO2 in the Okta admin dashboard under the authentication and security settings. (See Device Enrollment Configuration with Okta set-up).
- Operating System Compatibility: The operating system on the user’s device must be compatible with the YubiKey model being used. This includes support for the necessary USB or NFC interfaces provided by the YubiKey.
- User Training and Onboarding: Users will need to learn how to use their YubiKey, including initial setup using the Yubico Authenticator, PIN creation, and using it to login.
Device enrollment configuration with Okta set-up
Prerequisites
Disable use of Syncable Passkeys
-
WebAuthn supports enrollment of passkeys, a password-less type of authentication.
-
Passkeys can be saved to a cloud service such as Apple iCloud and transferred to other devices.
-
For this reason, it is preferred to disable this functionality for federal accounts.
-
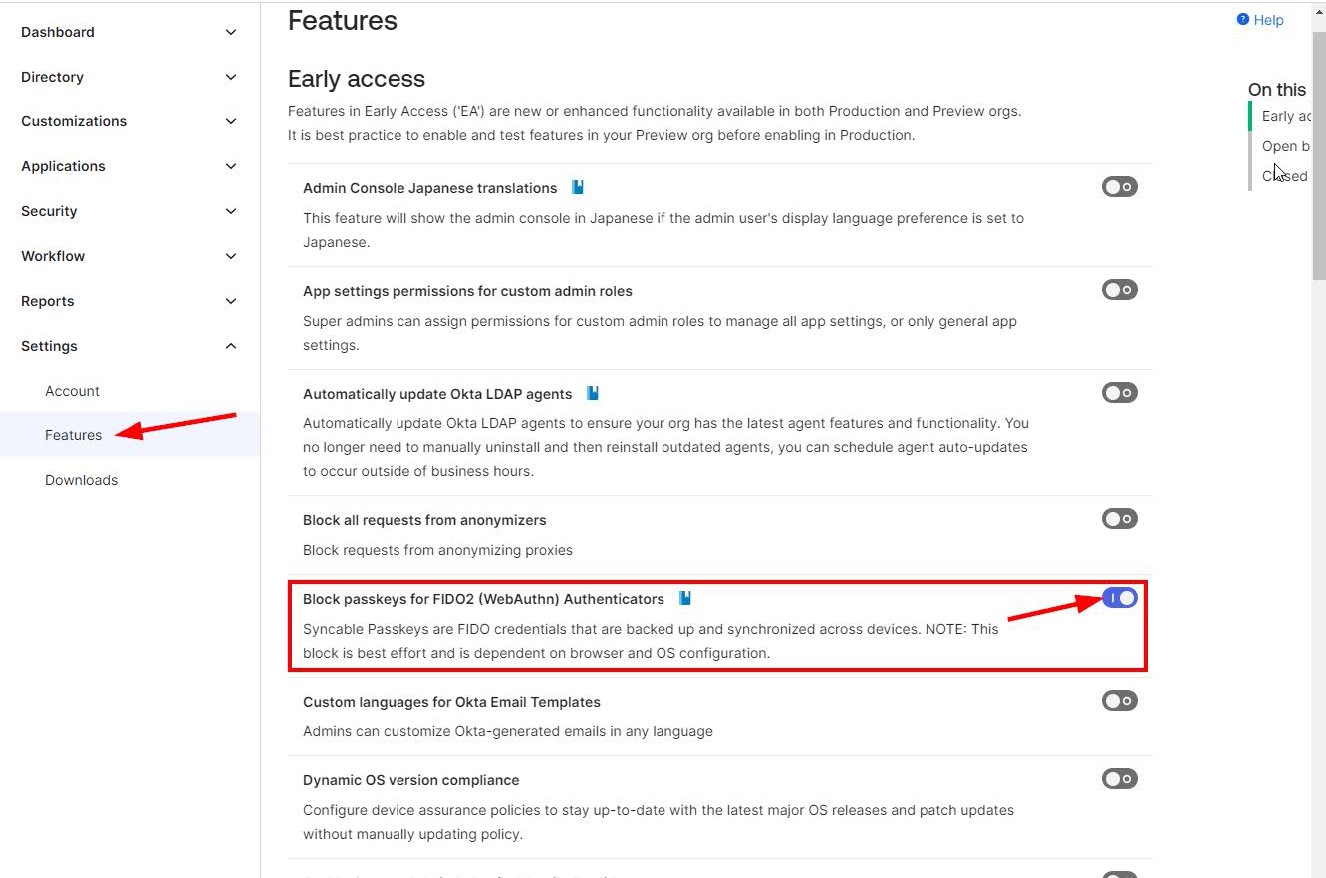
Navigate to Settings > Features on the left menu.
-
Ensure the feature “Block passkeys for FIDO2 (WebAuthn) Authenticators” is toggled to the enable position.
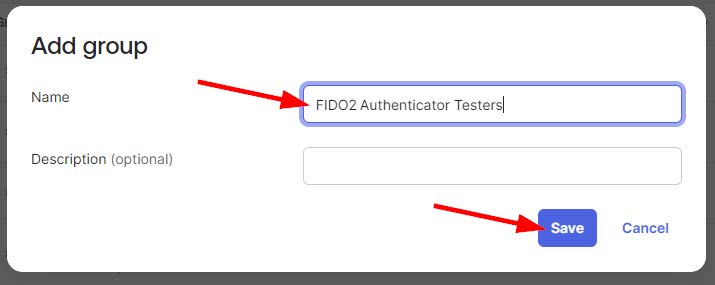
Create a Group for the WebAuthn policy
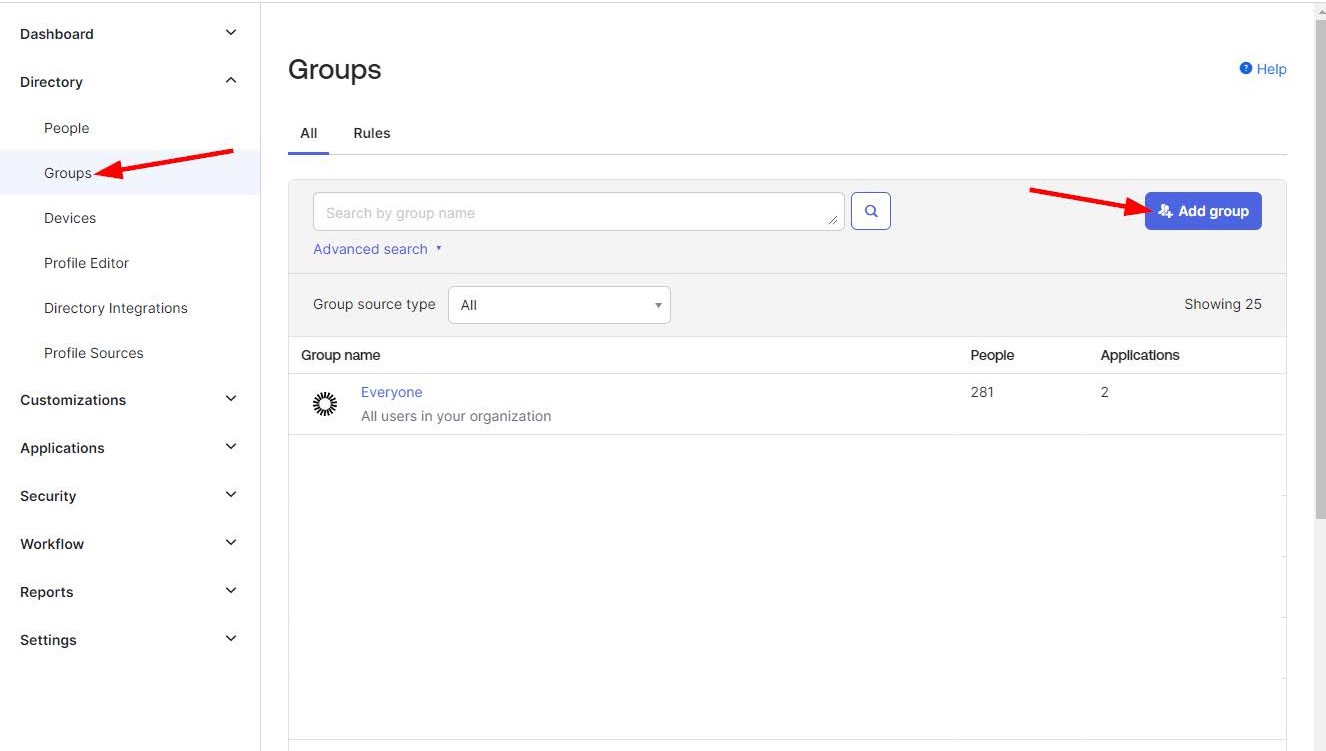
-
Okta policies are configured on a user group basis. The first step is to create a group.
-
Users added to this group will have the ability to use Yubikeys.
-
Enter a name and description and save the group.
Procedure
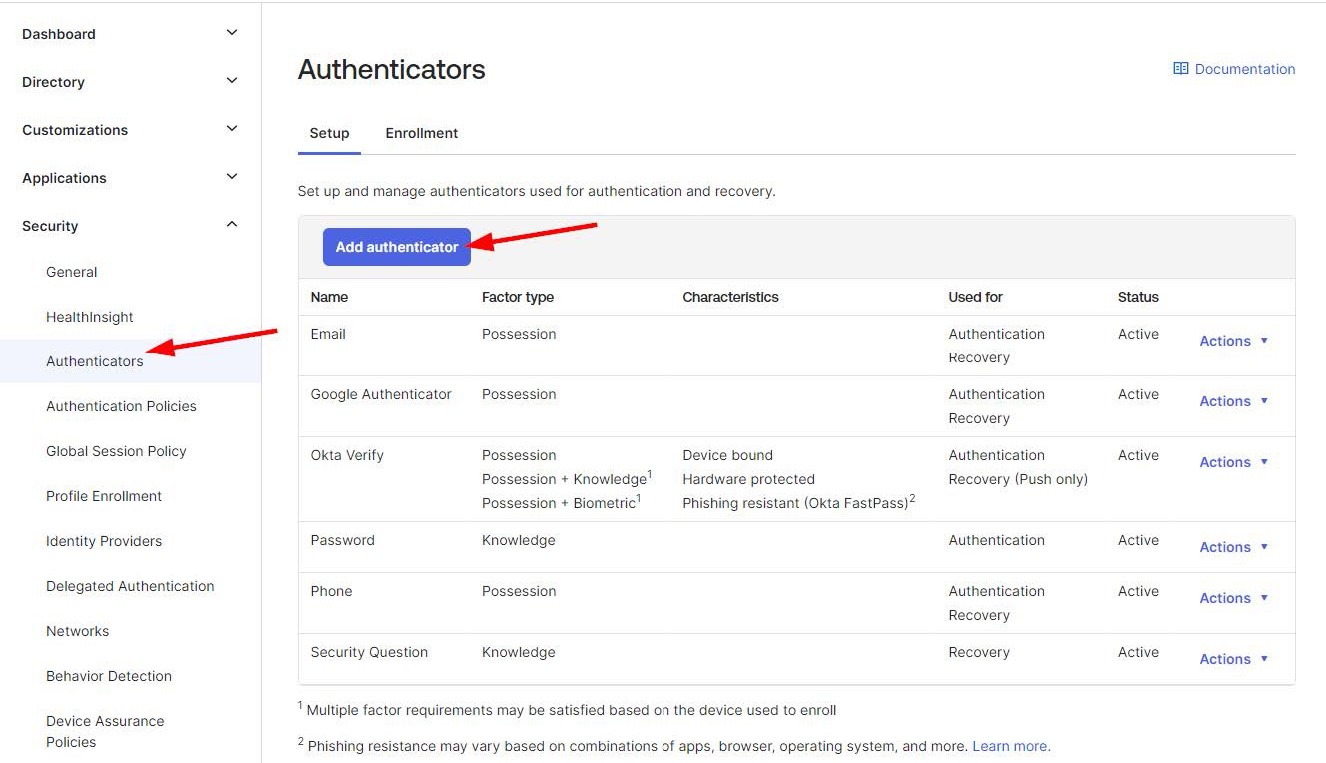
Enable the Authenticator
-
On the left menu navigate to Security > Authenticators.
-
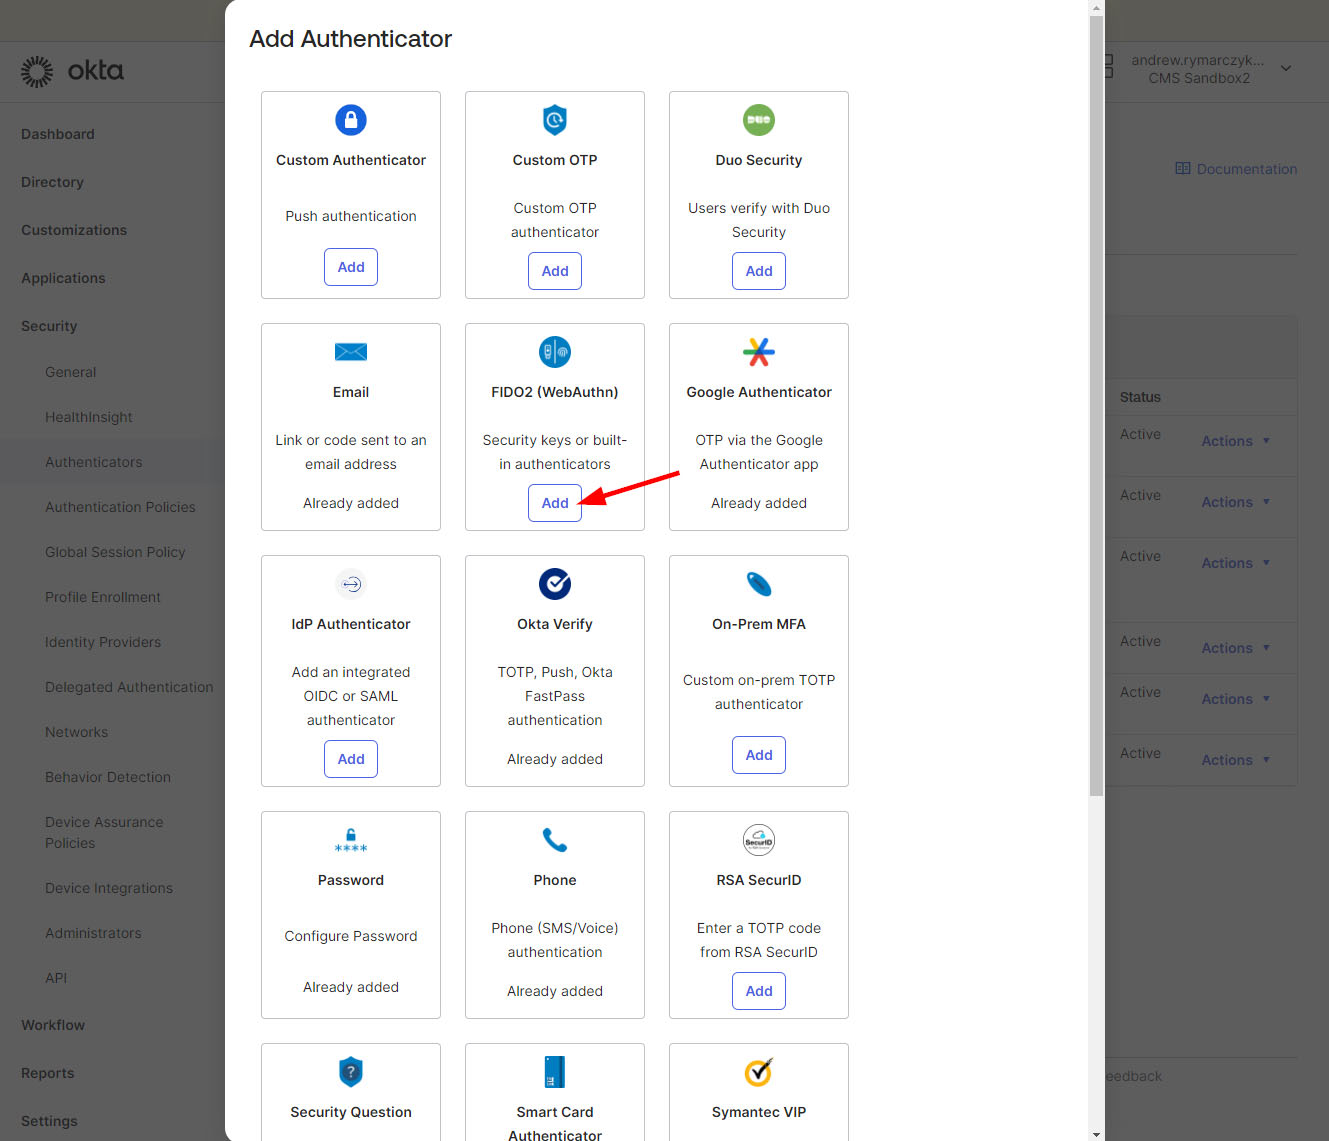
Click “Add Authenticator”
-
Under the “FIDO2 (WebAuthn)” tile, click the “Add” button.
-
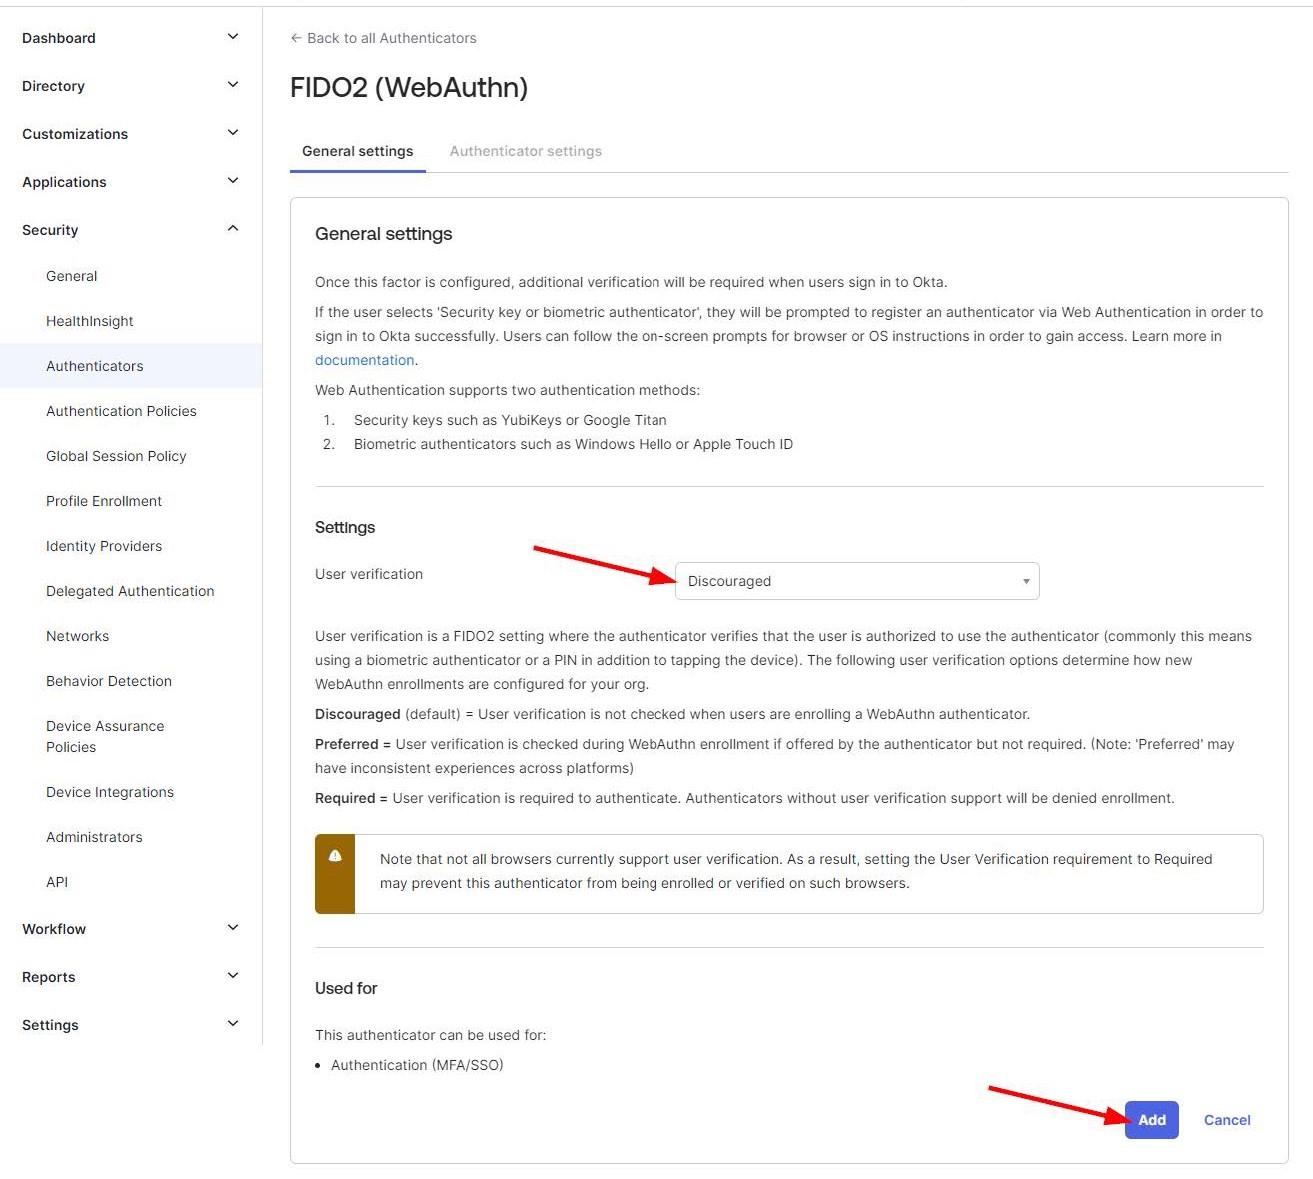
Set “User verification” to “Discouraged”.
-
Click the “Add” button.
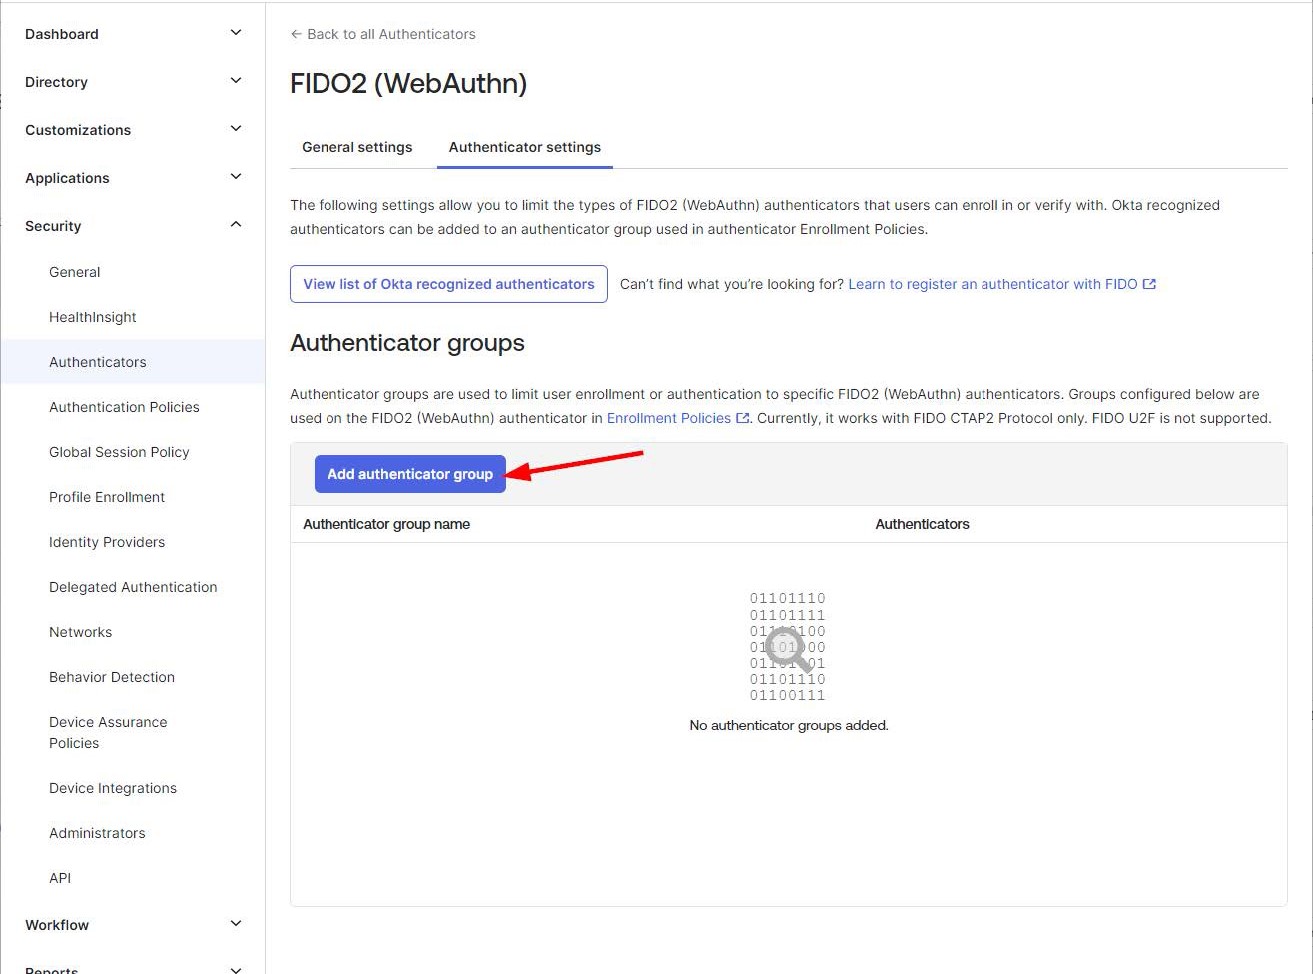
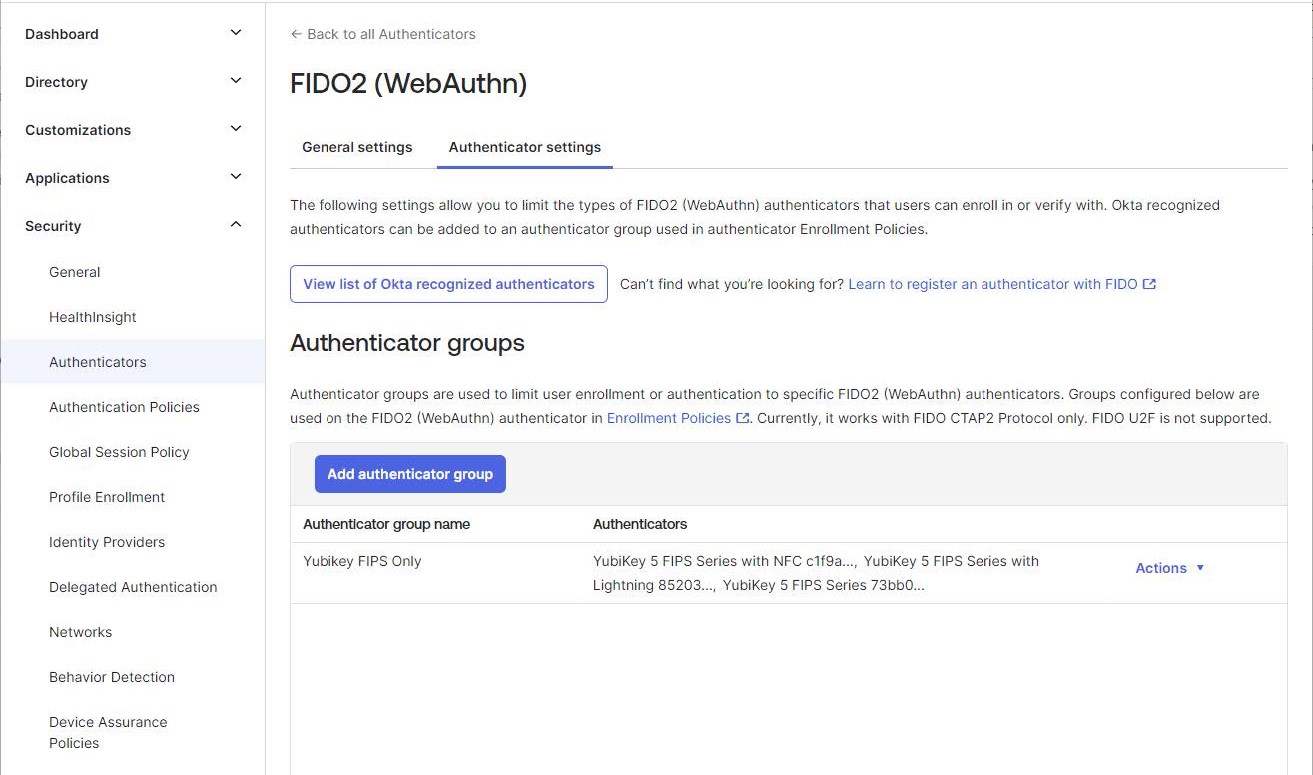
Optional Device Restrictions
After adding the FIDO2 authenticator you will see the “Authenticator settings” tab. This allows configuring the accepted devices when enrolling FIDO2 security tokens such as requiring the use of FIPS compliant security tokens.
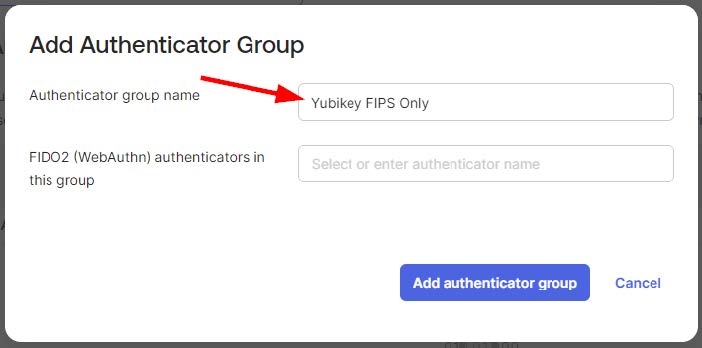
Restricting use to only FIPS compliant security tokens
-
Click the “Add authenticator group” button.
-
Enter a name for this group, for example “Yubikey FIPS Only”
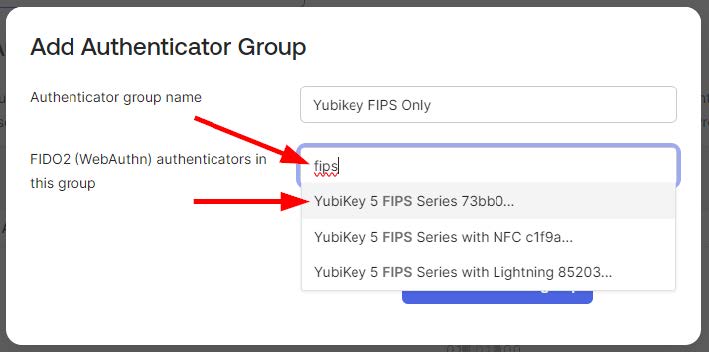
-
Search for the desired devices and select all that apply.
-
When all of the desired devices are selected click “Add authenticator group”
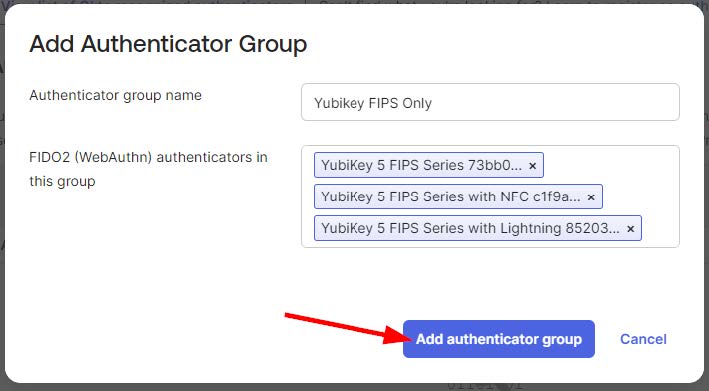
-
When finished you will see your group created
Create Enrollment Policy
-
The final step is to create an enrollment policy which will apply the desired group.
-
From the left menu navigate to Security > Authenticators, select the “Enrollment” tab, click “Add Policy”
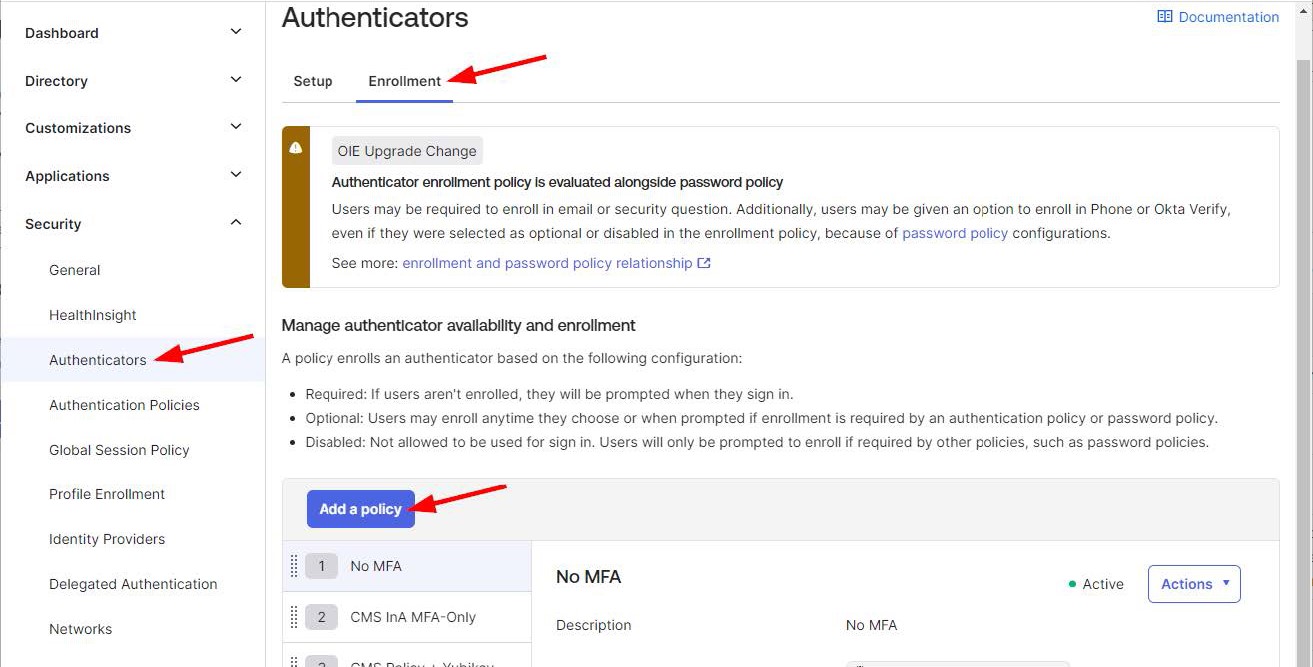
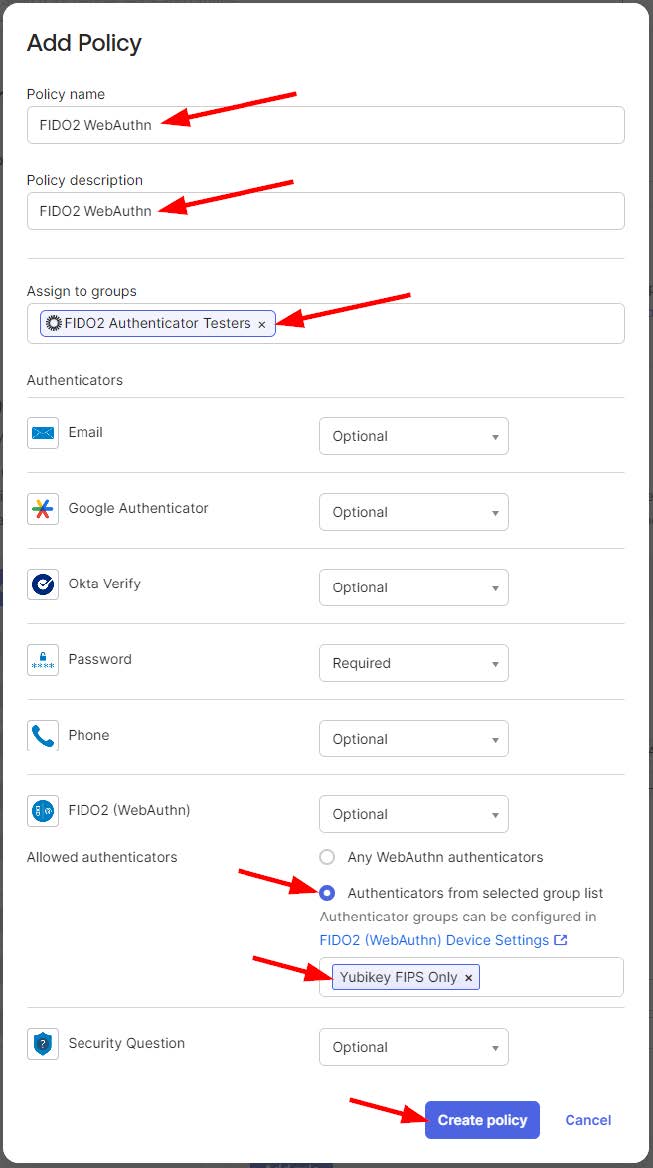
-
Enter a name for the policy.
-
Select a previously created group for the “Assigned to groups” field.
-
Optionally set “Allowed authenticators” to the “Authenticators from selected group list”.
-
Click “Create policy”.
-
On the next screen enter a name for the Enrollment Rule, click “Create rule”.
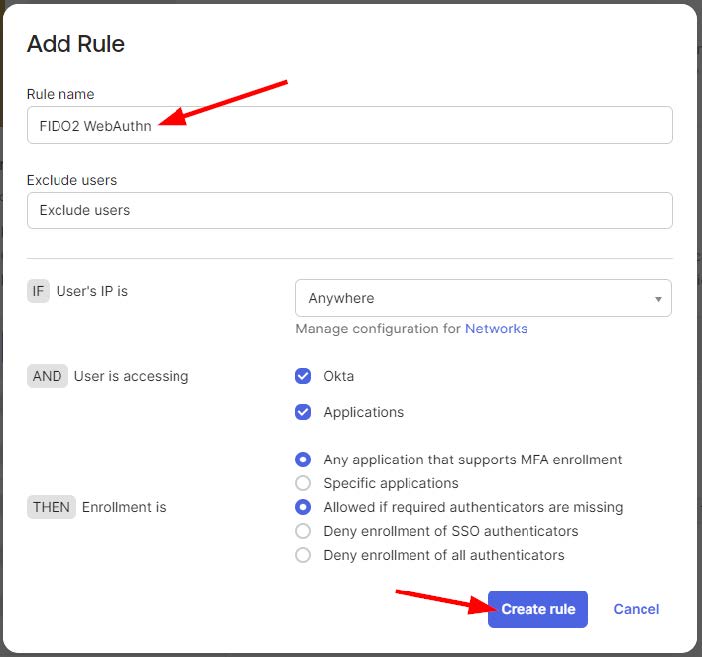
-
At this time, you will see your complete policy and rule.
-
Adjust the enrollment policy priority as desired to meet your requirements.
-
This concludes the configuration steps.
Setting up Yubico Authenticator for Mac
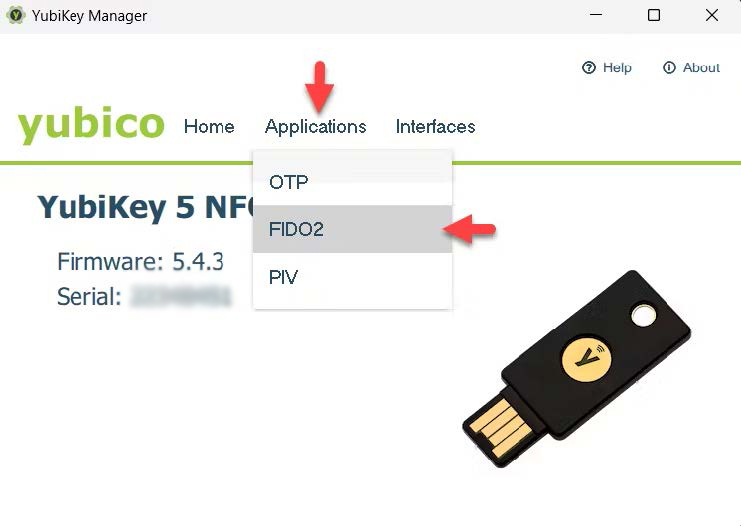
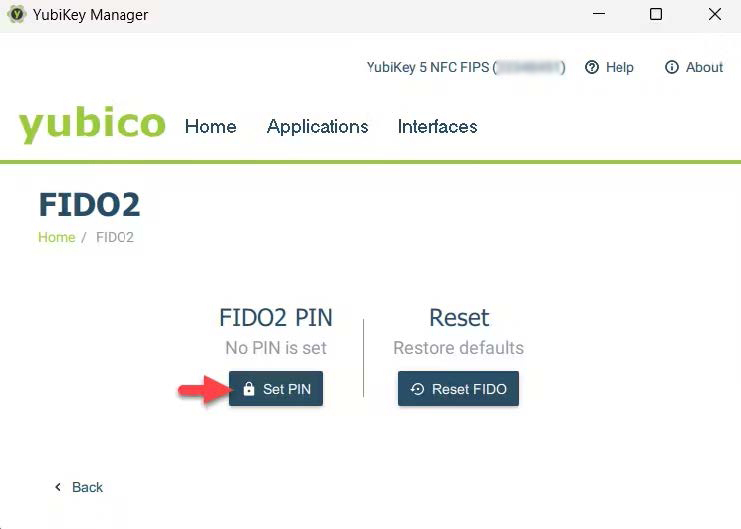
As of February 19, 2026, the YubiKey Manager GUI has reached end of life (EOL). Yubico has transitioned the features to a single app, Yubico Authenticator 7. This app will manage all aspects of Yubico product and feature management (PIV configuration, passkey PIN setup, 2FA codes, etc). This guide explains how to install and use Yubico Authenticator 7, as well as how to enroll your Yubikey on IDM and use it for authentication.
Step 1 - Installing and Using Authenticator
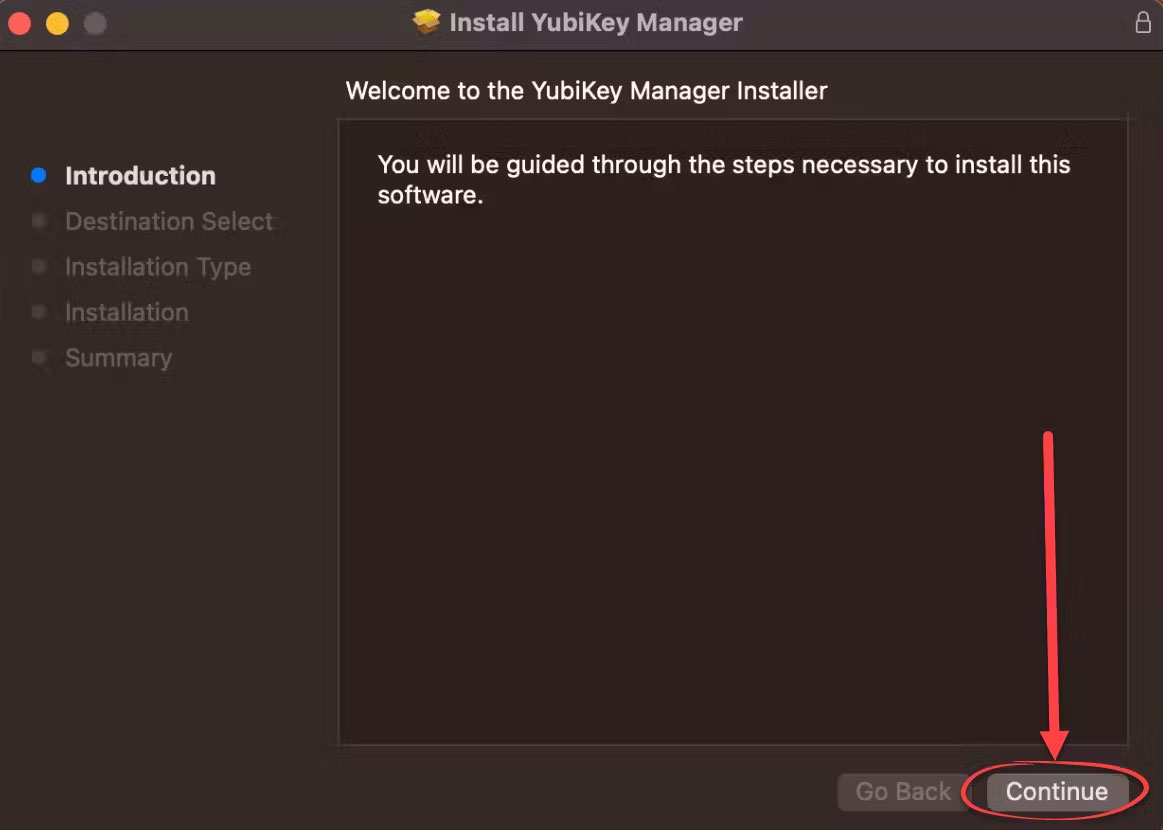
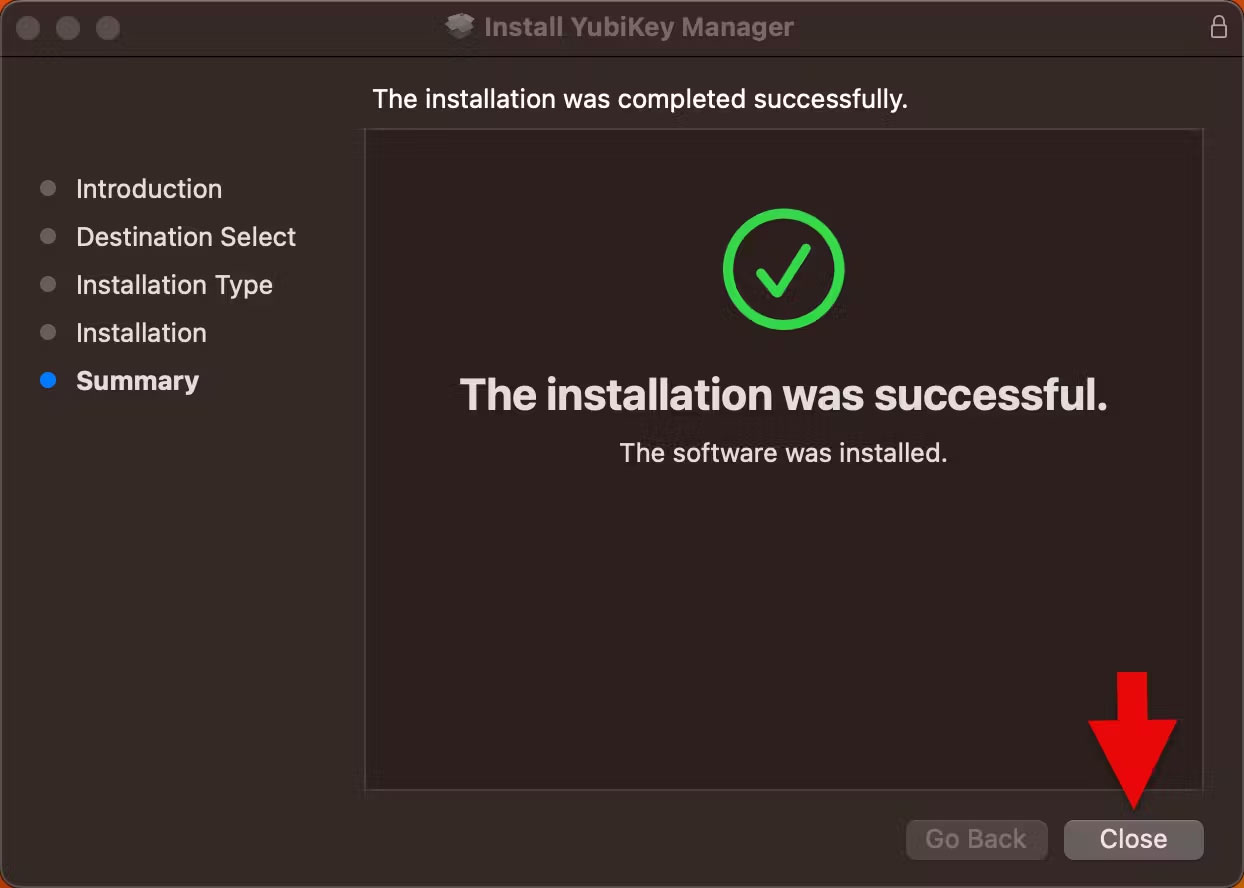
- Install Yubico Authenticator.
- Download the Yubico Authenticator from this link. The installer package will save to a folder in your machine (Likely Downloads); locate it and double-click to open the Installer.
- Install Authenticator by dragging the Yubico Authenticator App into the Applications folder.
- Open Authenticator.
- Locate the Authenticator app and open it.
- Insert a Yubikey into your machine.
- Insert your Yubikey into your computer. Authenticator will recognize the key and display it in the app. You may need to click “Allow” in the dialog box that appears.
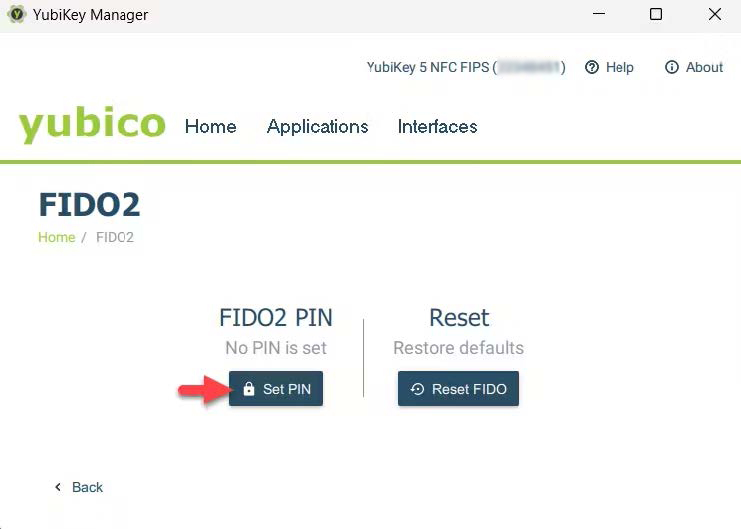
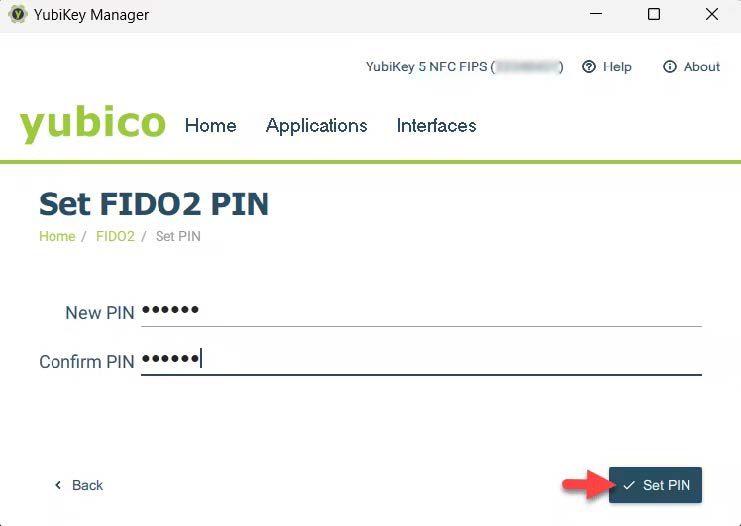
Setting and Changing a PIN
- With your Yubikey inserted, click “Passkeys” on the left-hand menu.
- On the right-hand side of the screen, below “Manage,” click “Set PIN.”

- Create a PIN and verify it. The PIN can contain letters, numbers, and special characters, and be up to 63 characters long. Click “Save.”
- This PIN will be used for enrolling your Yubikey and for subsequent access requests.
- To change a PIN, click “Change PIN” under “Manage.” Note that “Change PIN” only appears once a PIN has been set.
Enrolling a Yubikey on CMS IDM
- Navigate to CMS IDM and log in using your User ID and password. Complete the MFA challenge as needed.
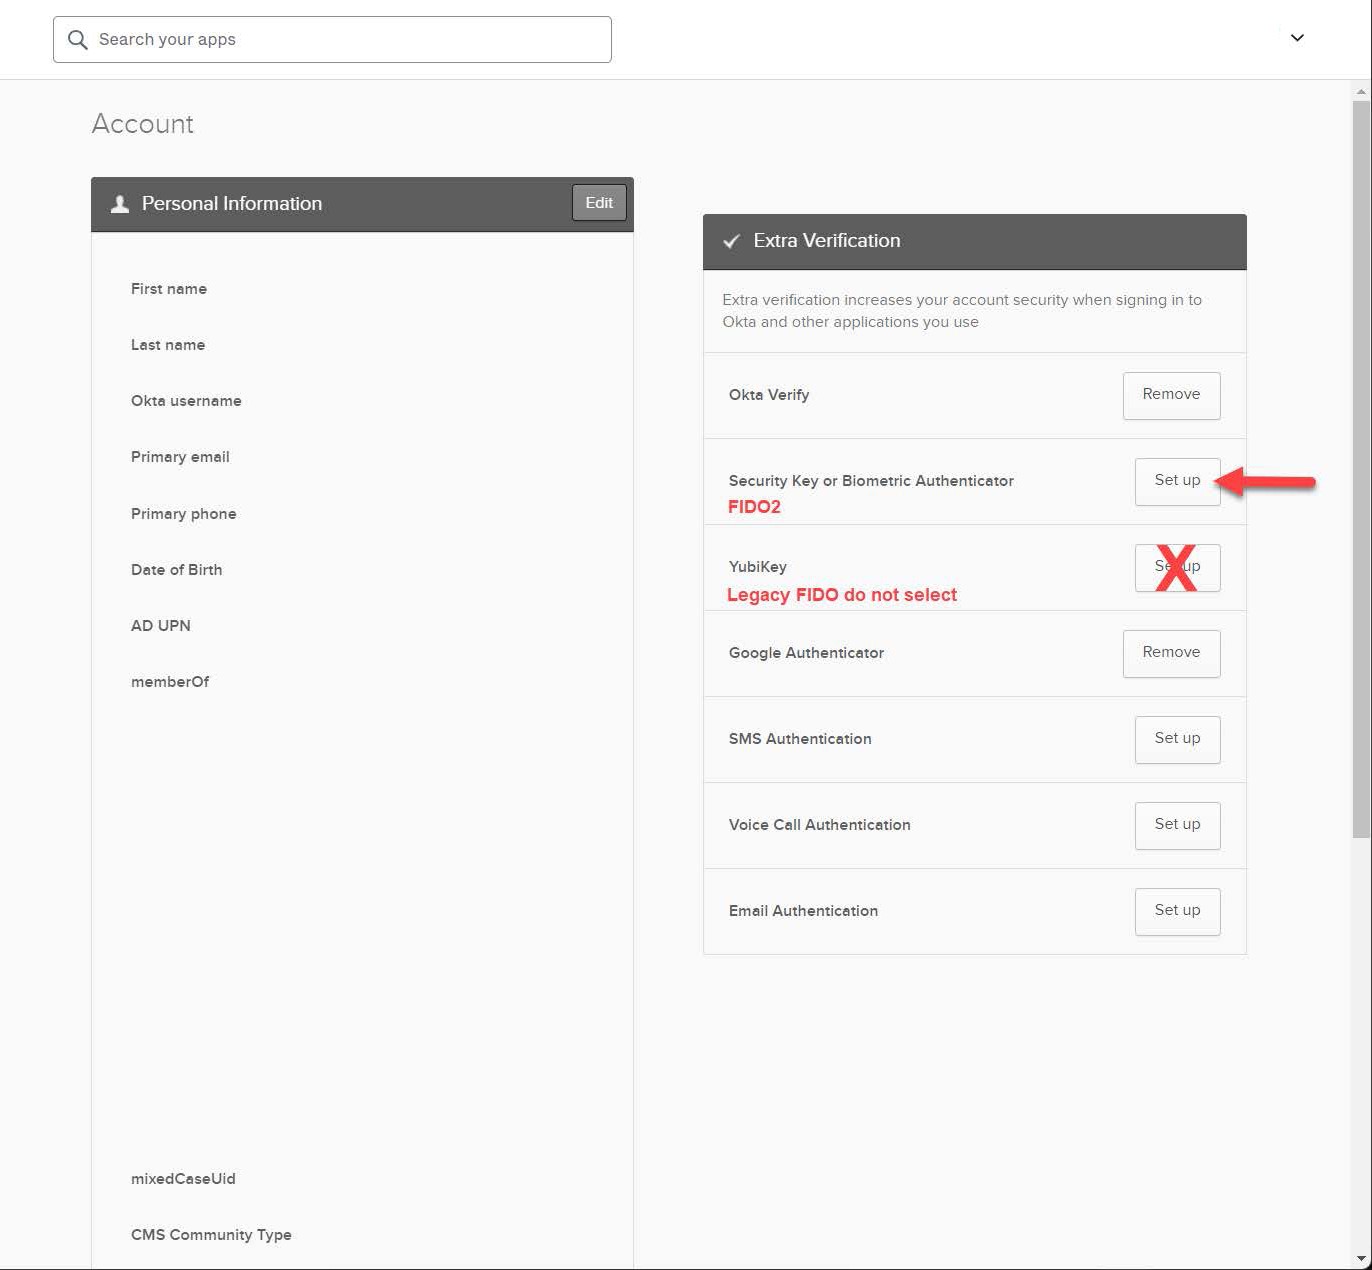
- Click your name in the top-right corner, and click “Settings.”

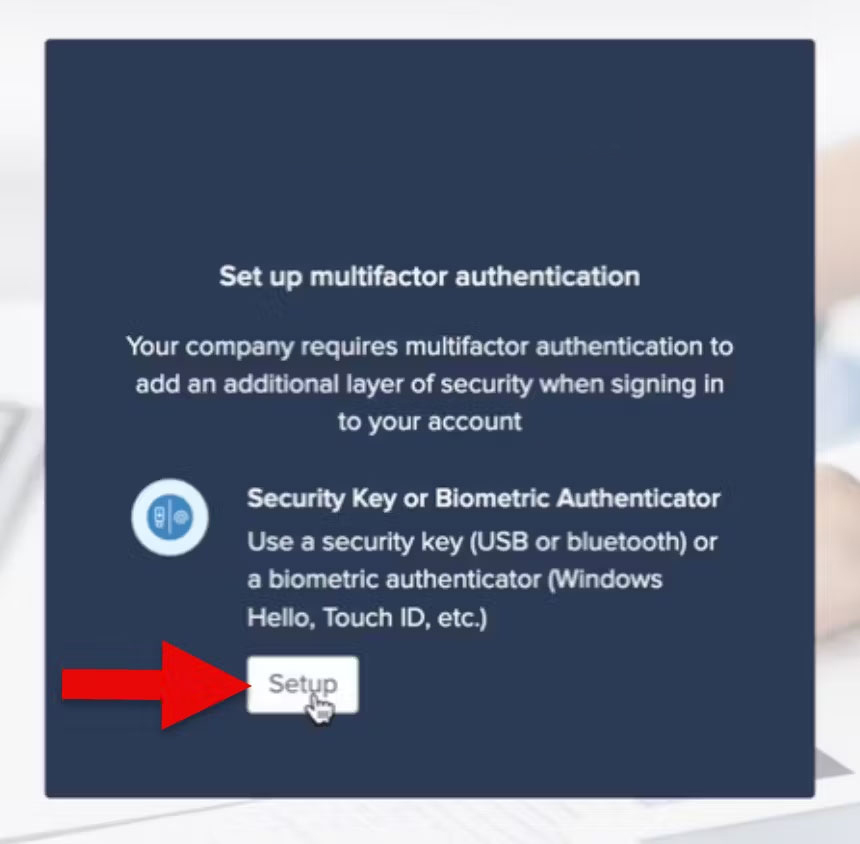
- Scroll to “Security Methods” and select “Set Up” next to “Security Key or Biometric Marker.” Do not select “Yubikey Authenticator.”

- Click “Set up.”
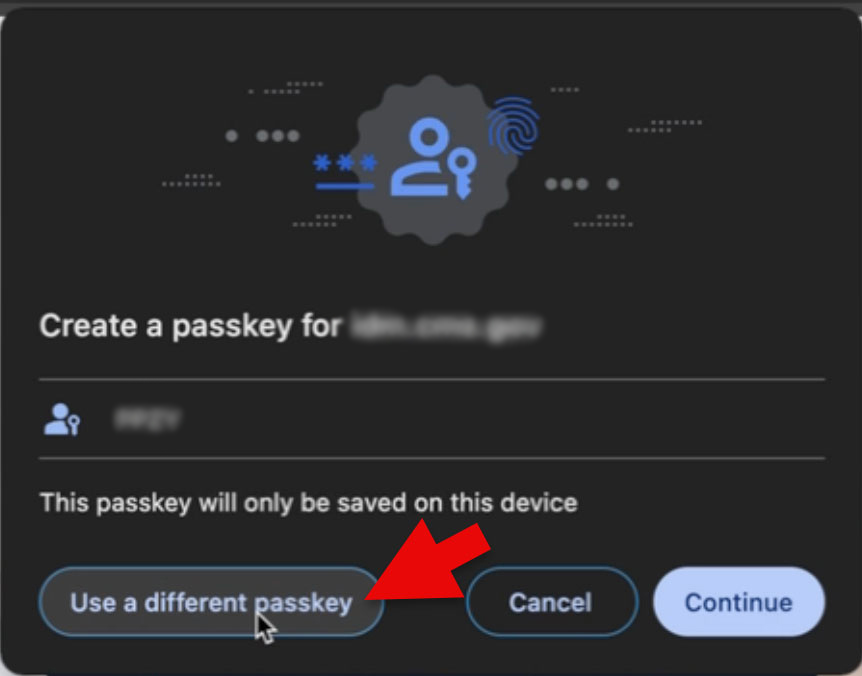
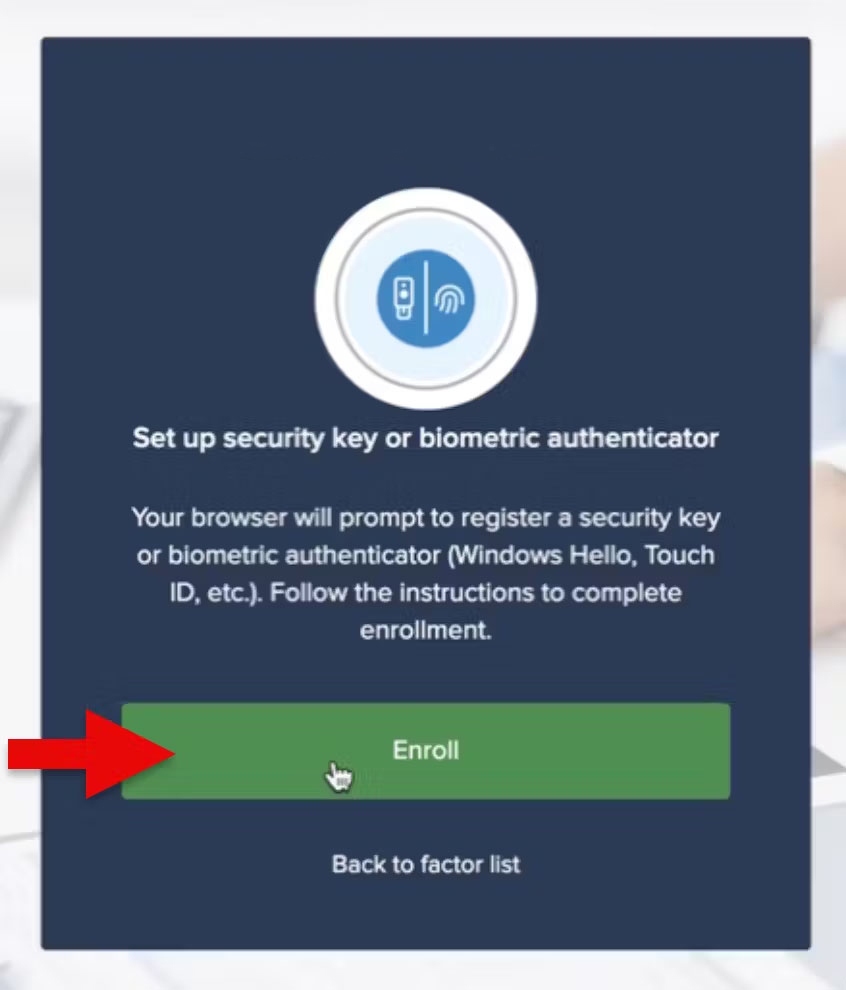
- In the following dialog box, click “Enroll.”

- Click the “Use a different passkey” button.
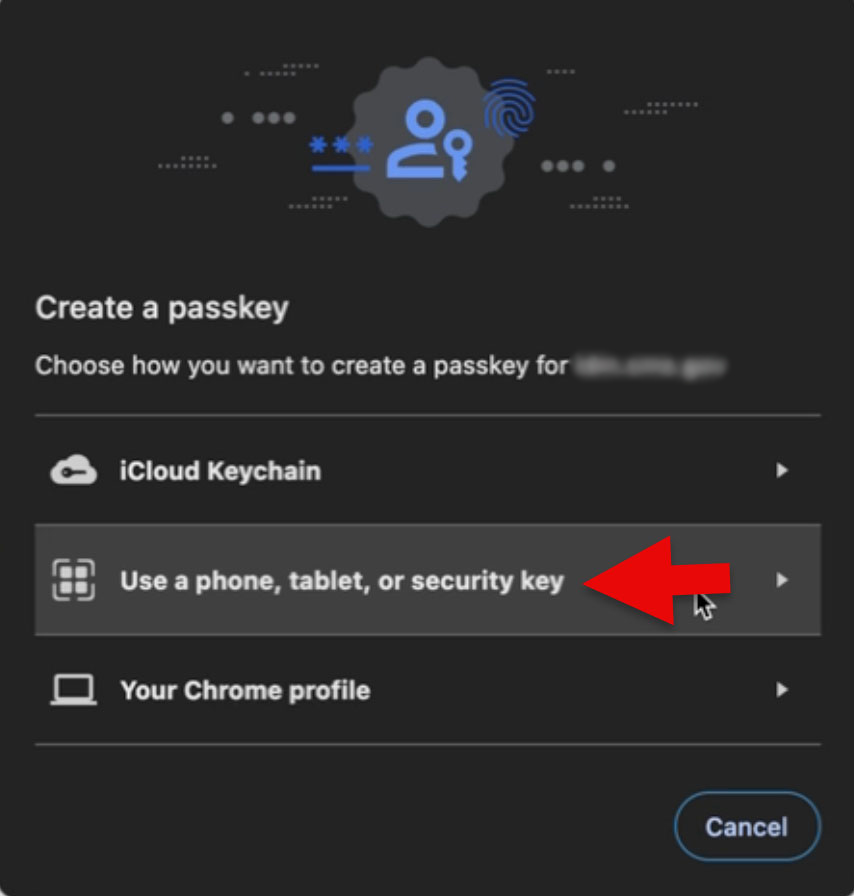
- Select “Use a phone, tablet, or security key” menu option.
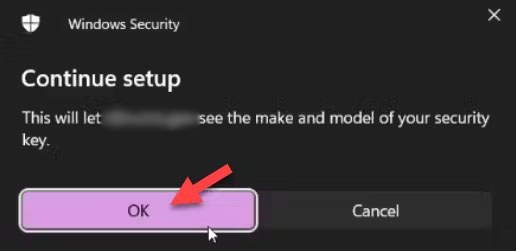
- Activate your YubiKey by touching the gold sensor on the device. If it doesn’t respond, unplug and re-insert the YubiKey.

- Enter the PIN you created earlier and click “Next.”
- Touch the Yubikey’s gold sensor again.
- Click “Allow” when prompted. This completes the enrollment.
- To confirm, open IDM > Settings > Security. Confirm that you see your security key.

Log into CMS IDM with Yubikey
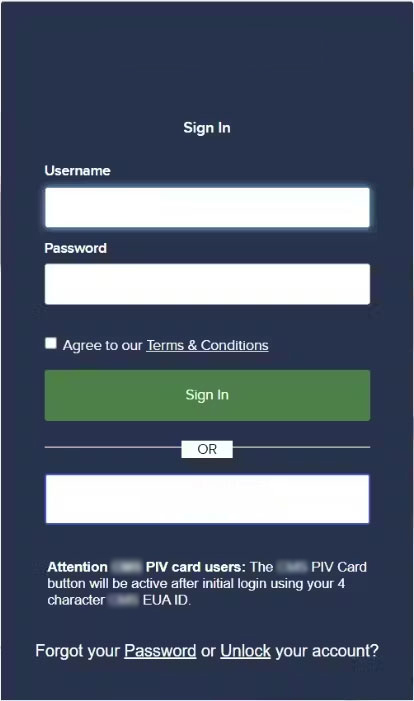
- Login to the CMS IDM portal and sign in with your EUA Username and password. Agree to the Terms & Conditions and select “Sign In.”

- When prompted, touch the Yubikey’s gold sensor.
- Enter the PIN you established earlier and click “Next.”
- Touch the gold sensor on the YubiKey again.

- You have successfully completed the security key login process!
Setting Up Yubico Authenticator for Windows Machines
As of February 19, 2026, the YubiKey Manager GUI has reached end of life (EOL). Yubico has transitioned the features to a single app, Yubico Authenticator 7. This app will manage all aspects of Yubico product and feature management (PIV configuration, passkey PIN setup, 2FA codes, etc). This guide explains how to install and use Yubico Authenticator 7, as well as how to enroll your Yubikey on IDM and use it for authentication.
Step 1 - Installing and Using Authenticator
- Install Yubico Authenticator.
- Download the Yubico Authenticator from this link. The installer package will save to a folder in your machine (Likely Downloads); locate it and double-click to open the Installer.
- Install Authenticator by clicking “Next” and finally “Install” in the dialog boxes of the installer. If needed, authorize the installation onto your machine. Once complete, click “Finish.”
- Open Authenticator.
- Locate the Authenticator app and open it.
- Insert a Yubikey into your machine.
- Insert your Yubikey into your computer. Authenticator will recognize the key and display it in the app.

Setting and Changing a PIN
- With your Yubikey inserted, click “Passkeys” on the left-hand menu.
- On the right-hand side of the screen, below “Manage,” click “Set PIN.”
- Create a PIN and verify it. The PIN can contain letters, numbers, and special characters, and be up to 63 characters long. Click “Save.”
- This PIN will be used for enrolling your Yubikey and for subsequent access requests.
- To change a PIN, click “Change PIN” under “Manage.” Note that “Change PIN” only appears once a PIN has been set.
Enrolling a Yubikey on CMS IDM
- Navigate to CMS IDM and log in using your User ID and password. Complete the MFA challenge as needed.
- Click your name in the top-right corner, and click “Settings.”
- Scroll to “Security Methods” and select “Set Up” next to “Security Key or Biometric Marker.” Do not select “Yubikey Authenticator.”
- Click “Set up.”

- In the following dialog box, click “Enroll.”

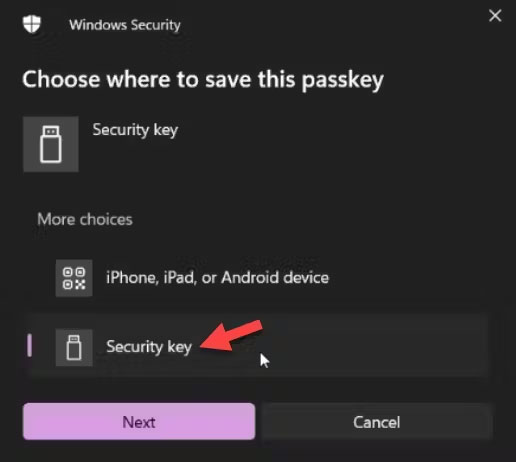
- Select the Security Key and then click “Next.”

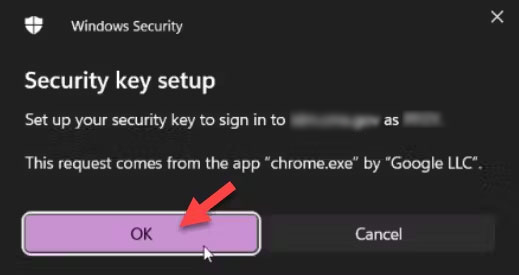
- Click “OK” to continue through the process.
- Enter the PIN you established earlier, and click “OK.”

- Activate your YubiKey by touching the gold sensor on the device. If it doesn’t respond, unplug and re-insert the YubiKey.
- The Passkey is saved. Click OK.

- To confirm, open IDM → Settings → Security. Confirm that you see your security key.
Log into CMS IDM with Yubikey
- Login to the CMS IDM portal and sign in with your EUA Username and password. Agree to the Terms & Conditions and select “Sign In.”
- Windows will open a dialog box. Select “Security key” and click “Next.”
- Enter the PIN you established earlier and click “Ok.”
- Touch the gold sensor on the YubiKey.
- You have successfully completed the security key login process!
Glossary of Terms
FIDO2 Authentication: A modern authentication standard that strengthens security by allowing users to utilize local biometrics and security keys for passwordless logins or as a part of multi-factor authentication. FIDO2 is an enhancement of the original FIDO standards, adding support for passwordless authentication and expanded browser support through its WebAuthn component.
WebAuthn (Web Authentication): A web standard published by the World Wide Web Consortium (W3C) in collaboration with the FIDO Alliance, which specifies a built-in browser API enabling online services to offer a secure, passwordless login experience using public key cryptography. WebAuthn allows users to authenticate themselves on the internet using biometrics, mobile devices, or FIDO2 devices like security keys, instead of relying on traditional passwords.
FIPS (Federal Information Processing Standards): U.S. government standards that coordinate the requirements for cryptographic modules, including both hardware and software components, used within a security system to protect sensitive but unclassified information.
Passkey: A digital credential, also known as a hardware passkey when stored on a YubiKey, used in place of traditional passwords as part of modern FIDO2 authentication systems to provide a more secure and streamlined login experience. Passkeys enhance security by utilizing public-key cryptography, making them inherently resistant to phishing and ensuring they cannot be reused across different websites, which significantly reduces the risk of credential theft.
PIN (Personal Identification Number): A numeric or alphanumeric password used in the authentication process to verify the identity of a user accessing a system or device.
Multi-Factor Authentication (MFA): A security system that requires more than one method of authentication from independent categories of credentials to verify the user’s identity for a login or other transaction.
Security Key: A physical device used to access computers, networks, and online accounts by proving possession of the key as a form of authentication.
USB-C: A type of USB connector that is reversible, allowing it to be plugged in either direction, and supports faster data transfer, increased power flow, and video delivery.
USB-A: The original standard USB connector, which is flat and rectangular in shape, commonly used to connect devices like keyboards, mice, and external hard drives to computers.
NFC (Near Field Communication): A set of communication protocols that enable two electronic devices, one of which is usually a portable device such as a smartphone, to establish communication by bringing them within 4 cm of each other.
YubiKey: A small hardware device produced by Yubico, that provides secure two-factor, multi-factor, and passwordless authentication that supports protocols such as FIDO2 and U2F.
Okta: A cloud-based service that provides identity management and access management solutions, enabling secure authentication and user verification across various platforms and applications.
Yubikey FAQs
Why do I need a PIN for my YubiKey?
Think of your YubiKey like a debit card for digital security. Just as your bank card uses a PIN to keep your money safe, your YubiKey uses a PIN for an extra layer of protection. This means that if someone ever gets their hands on your security key, they still can’t use it unless they know your unique PIN. Additionally, the policies which govern IDM at Okta require a PIN when you first set up your security key, ensuring that it’s really you who’s activating it.
What are Platform Authenticators and how come I can’t use my smartphone to enroll a security key?
Platform authenticators (also known as Internal Authenticators) are security features built directly into devices you own, such as smartphones and laptops. These utilize biometrics, like a fingerprint or facial recognition, or a device PIN to meet FIDO2 standards. The core of FIDO2 technology relies on Passkeys (specifically resident or “private” keys), which act as digital keys for a locked door. On a platform authenticator, these keys are often “synced” to the cloud to allow for easier recovery if you lose your device. In a federal context, this cloud synchronization presents security and audit risks because the organization cannot verify exactly where those private keys are stored or who has access to the cloud provider’s infrastructure. External authenticators (like your YubiKey) are independent devices with a single purpose. They store passkeys directly on the hardware itself, meaning the private keys reside solely within the physical bounds of the device. Because these keys cannot be replicated or uploaded to the cloud, they offer a higher level of security and meet the strict administrative standards required for federal systems.
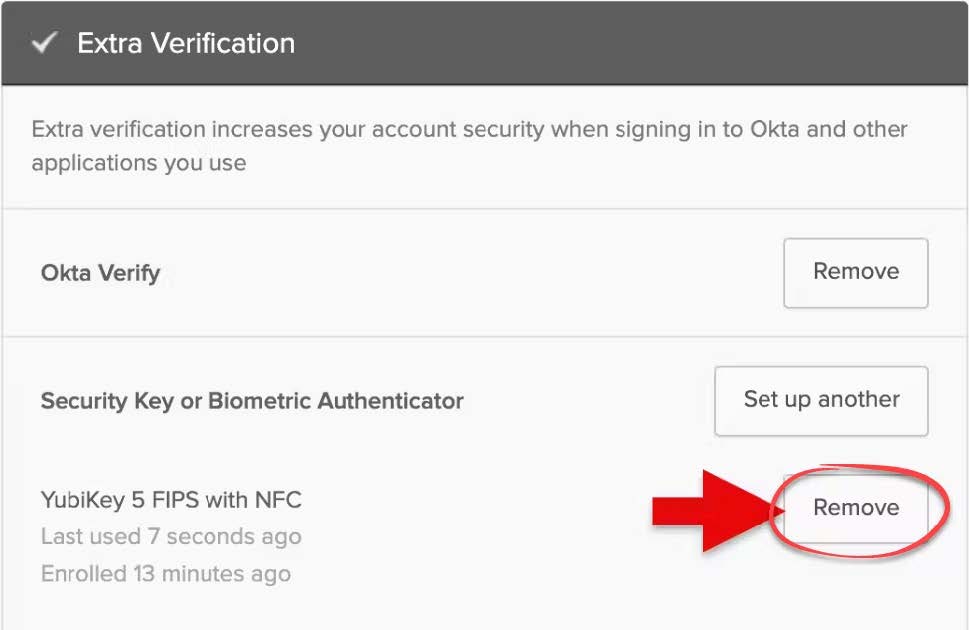
How do I unlink the YubiKey from CMS IDM?
To remove your YubiKey from CMS IDM
-
Login to the CMS IDM portal. Click your name to expand the drop down list and then select Settings


-
Navigate to the Extra Verifications section and click the Remove button adjacent to the YubiKey 5 FIPS with NFC menu option.
What should I do if I forget my YubiKey PIN?
To reset your YubiKey PIN complete the following steps:
- Open Yubico Authenticator and insert your Yubikey. Ensure you are on the “Home” area of the menu. Click “Factory Reset” under “Device” on the right-hand side.
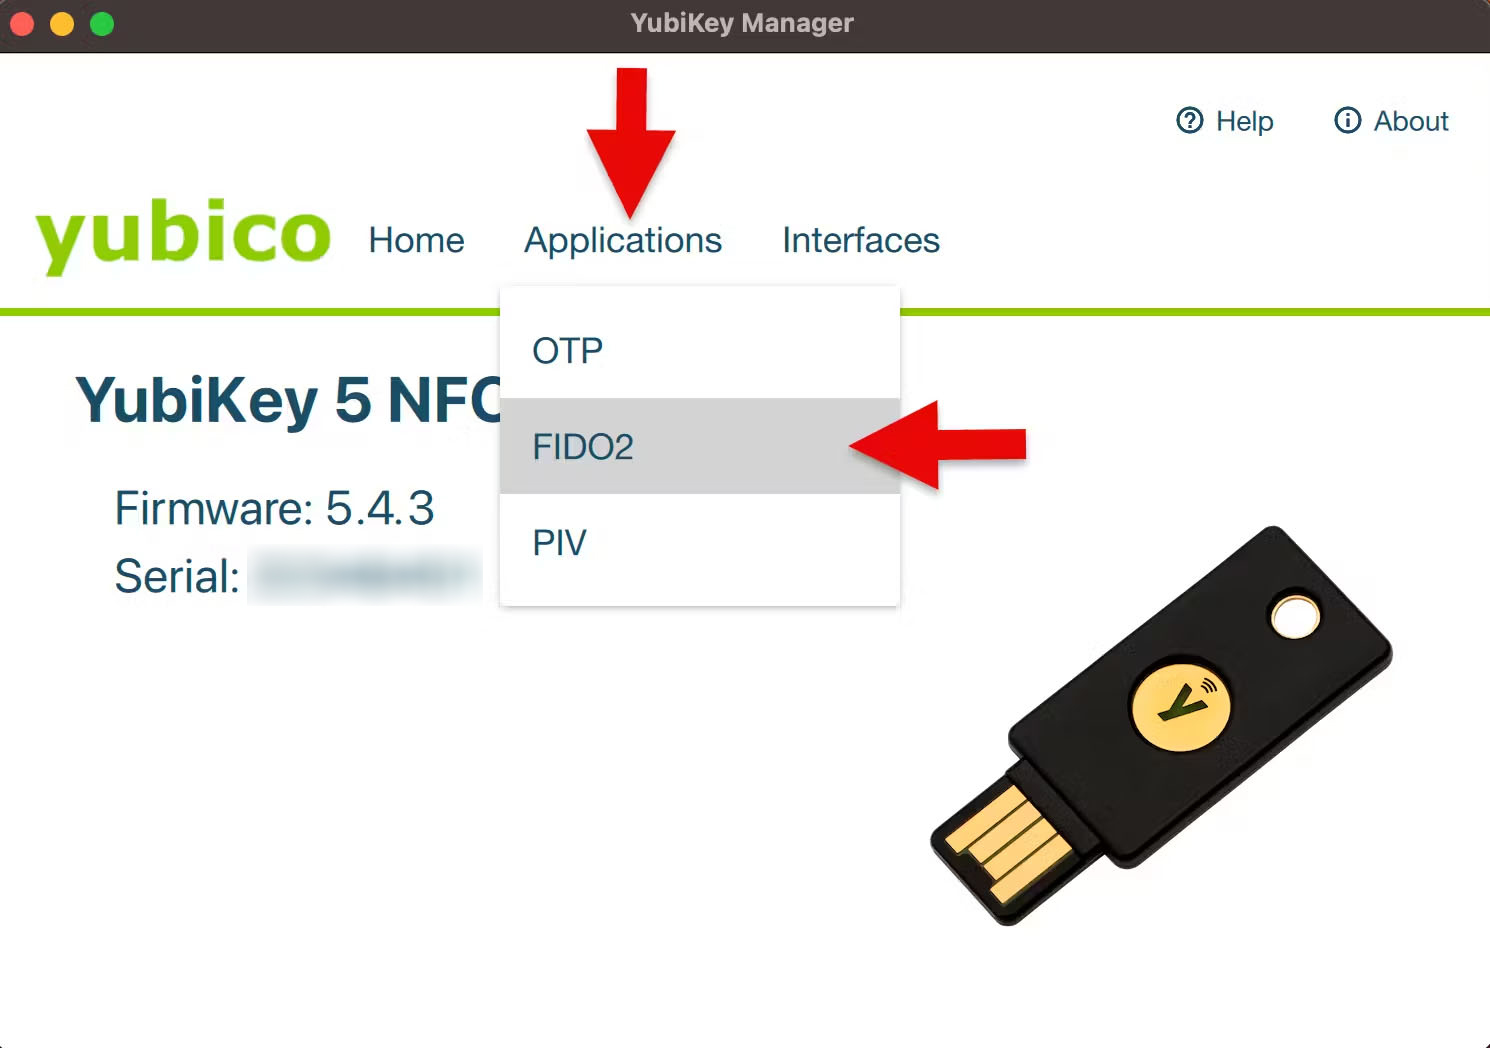
- Select “FIDO2” on the top menu, and click “reset.” Follow the instructions on the dialog box.
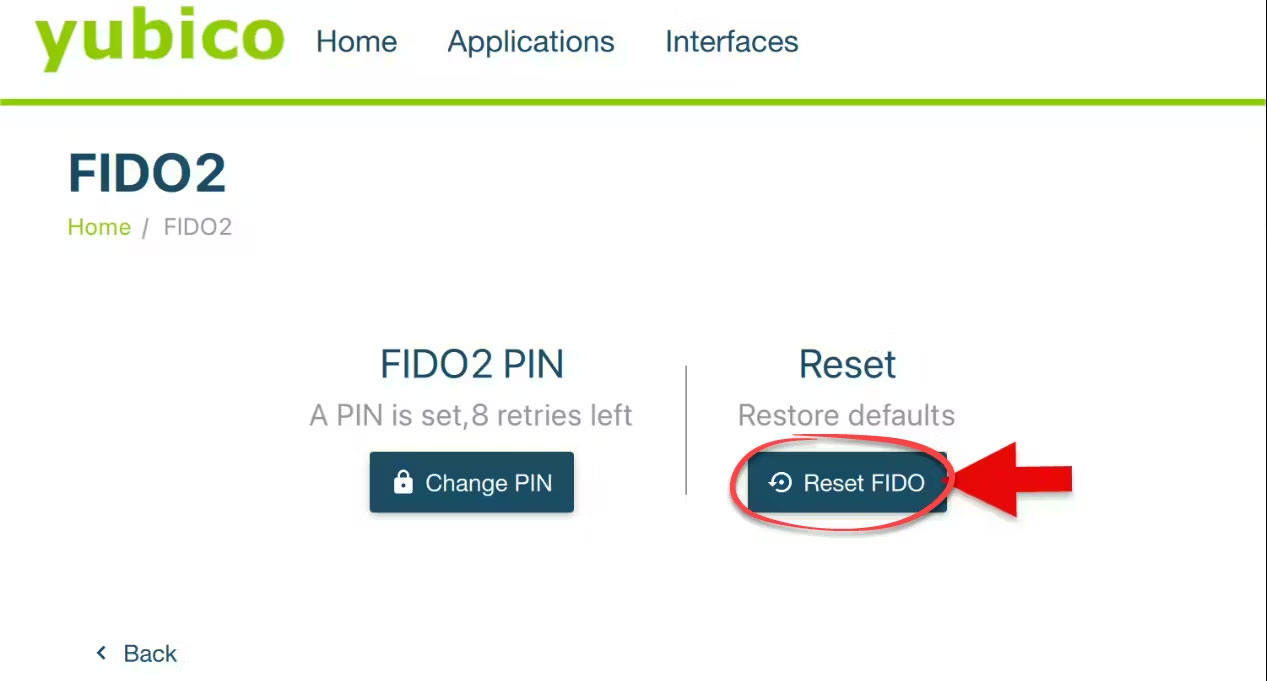
- Your Yubikey will be reset. Complete the enrollment process again to re-enroll the key.
Can’t access or reset your YubiKey?
If you’re without your YubiKey or forgot your PIN and had to reset, you can still access CMS IDM by choosing an alternative MFA method during the login process:
- Log into CMS IDM as usual until you reach the MFA prompt.
- Click Cancel.
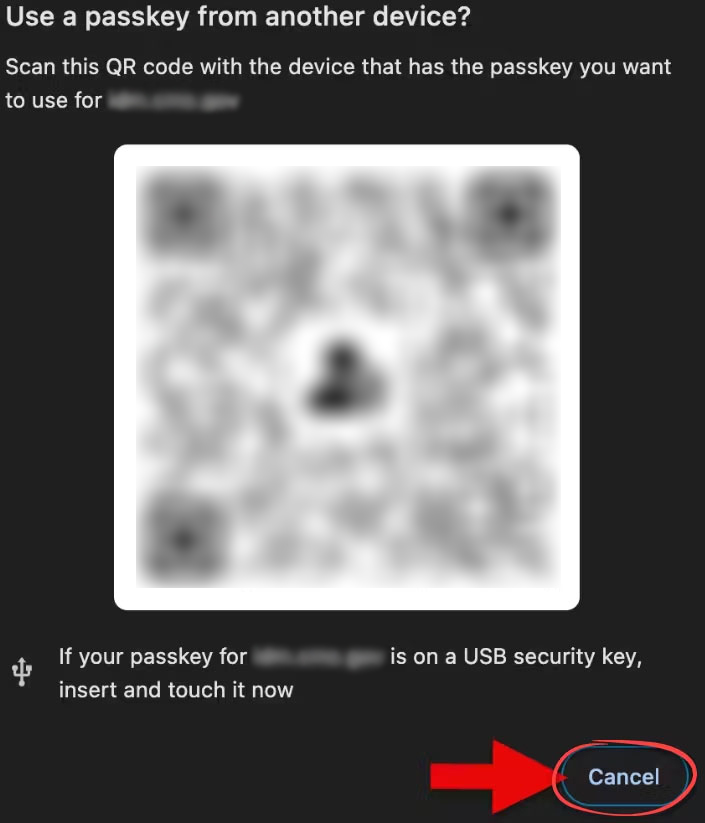
- Click the drop-down list arrow and select an alternate MFA method.
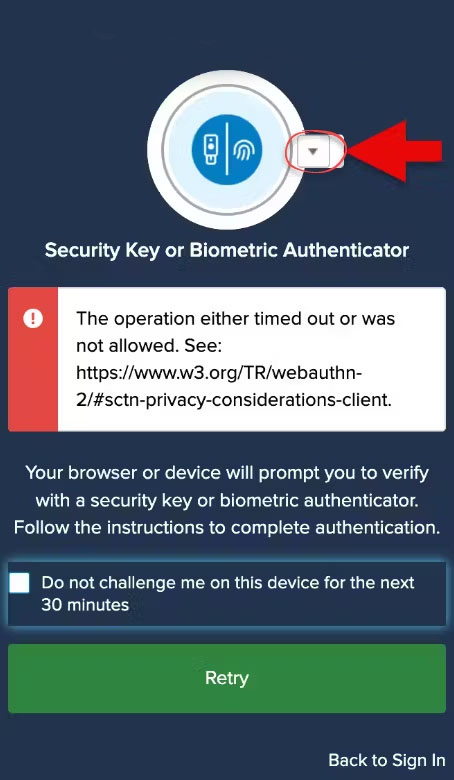
- Select a verification method from the list of previously configured options, such as Okta Verify or Google Authenticator. Click Retry.
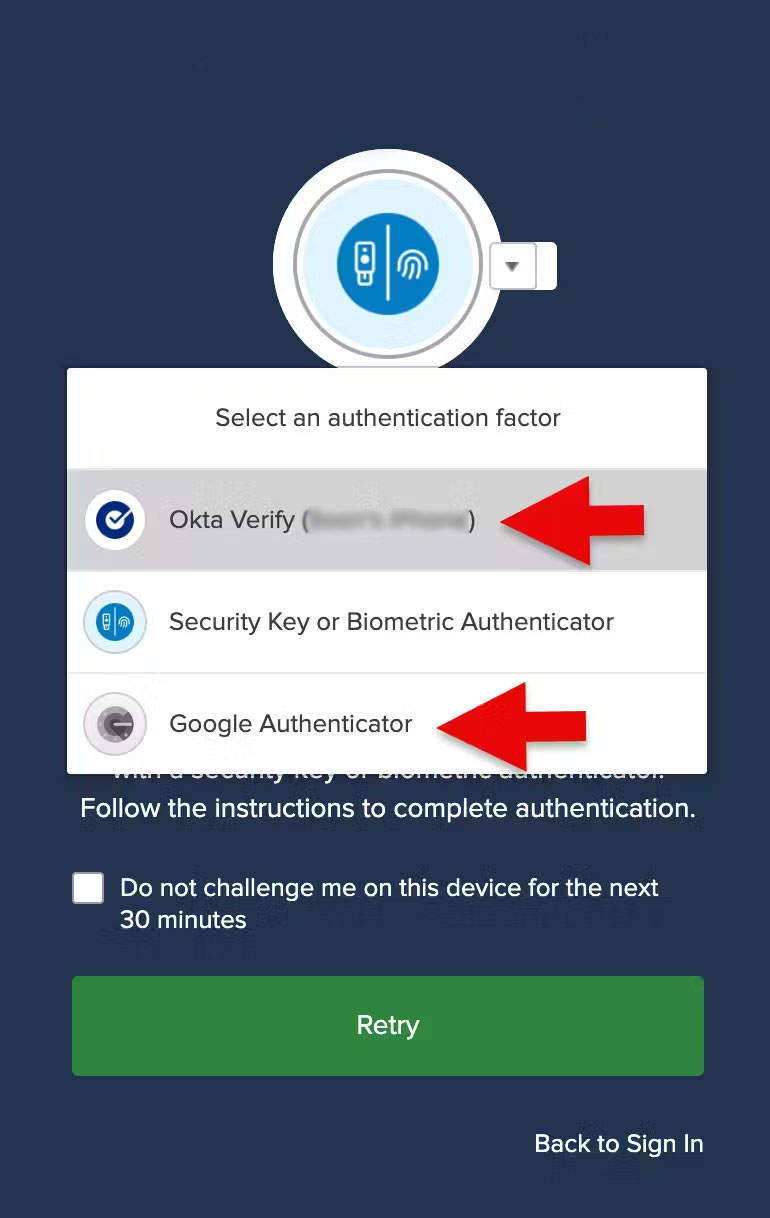
- Complete the MFA logon process. Re-enroll your security key ONLY IF you reset your YubiKey.